Use the AVS Device SDK Console Sample Application
After you build your AVS prototype, you can use the AVS Device SDK Console Sample Application. For details about how to build the sample application, see The AVS Device SDK Console Sample App Overview.
If you built your prototype and your sample application is running, you see the following ASCII art in the terminal window.

Authorize the sample application
Before you can use the sample application, you have to authorize it with Amazon. For details, follow the instructions in one of the following quick start guides.
Unauthorized device
Before you authorize the sample application, your terminal displays a NOT YET AUTHORIZED message, such as the one in the following example. This means that the AVS client is waiting for authorization.
##################################
#       NOT YET AUTHORIZED       #
##################################
################################################################################################
#       To authorize, browse to: 'https://amazon.com/us/code' and enter the code: {XXXX}       #
################################################################################################
Authorized device
After you authorize the sample application, your terminal displays an Authorized! message, such as the one in the following example. This means that the AVS client is waiting for you to initiate a conversation.
###########################
#       Authorized!       #
###########################
########################################
#       Alexa is currently idle!       #
########################################
Test the sample application
You can test the sample application by saying the wake word if you have the wake word enabled, or by using tap-to-talk, followed by a request.
To test the sample application
-
Say "Alexa" into the microphone.
If you don't have a wake word enabled, you can trigger Alexa by using tap-to-talk.
You should see a series of messages scrolling in your terminal window. One of these messages shows a
Listeningstatus. This status indicates that the wake word you spoke triggered Alexa. -
Say "Tell me a joke."
Alexa responds with a funny joke. You should see the text change from
ListeningtoThinking..., thenSpeaking.The following screenshot shows the state of the sample application.

Interactions
You can trigger Alexa with a wake word or by using tap-to-talk. This configuration depends on what operating system that you use and what CMake parameters you used to build the SDK.
Interact with Alexa by using tap-to-talk
If your sample application doesn't use a wake word, press T+Enter to talk to Alexa. This command simulates a tap-to-talk interaction, which is equivalent to saying the Alexa wake word. To interact with the sample application , you might also have to connect a microphone to your computer. A standard pair of earbuds with a microphone attached should work.
You press the T key, and then press Enter.
You: What's the weather like?
Alexa: Right now in Portland, it's 71 degrees with sun….
Interact with Alexa by using a wake word
If your sample application uses a wake word engine, start your interaction by speaking the "Alexa" wake word.
You: Alexa, what is the current weather?
Alexa: Right now in Portland, it's 71 degrees with sun….
Try a multi-turn interaction
A multi-turn interaction is more natural method of communication with Alexa. You can continue with a conversation without starting every phrase with the "Alexa" wake word.
You: Alexa, set an alarm.
Alexa: What time?
You say a number.
You: Eight.
Alexa: AM or PM?
You respond with the appropriate choice.
Notice that despite having a bit of back and forth with Alexa, you only had to say the wake word one time at the start of the conversation.
To recognize this process in the sample application
- In your terminal window, scroll up until you see the state
LISTENING. - Directly above that the
LISTENINGstate, notice the state of the Audio Input Processor (AIP) changes fromIDLEtoEXPECTING_SPEECH, and then toRECOGNIZING—all without requiring the wake word again. This automated process only occurs during multi-turn turn interactions.
For details about multi-turn interactions, see SpeechRecognizer.

Other multi-turn interactions to try
You: Alexa, Wikipedia.
You have the option to request information about multiple topics without saying the wake word before the subject.
Multi-lingual interactions
Alexa can speak multiple languages, such as Japanese, German, Hindi, and other global dialects of English.
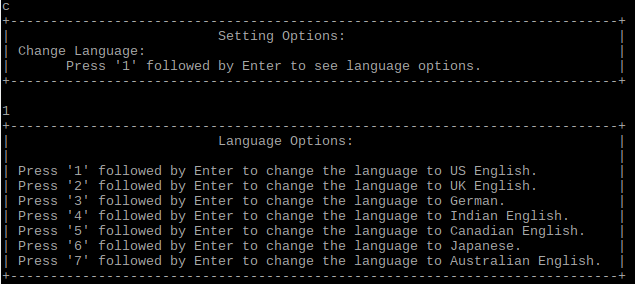
To view multi-language options
- Start the sample application.
- Press C+Enter.
- To see the language options, press 1.
When you release your product, and then your customer tries to change languages, your device sends a SettingsUpdated event to Alexa. The following screenshot shows the language options.
Sample application menu options
Interaction options
| Action | Command |
|---|---|
| Tap to talk | t+Enter, followed by your query (no need to say "Alexa..") |
| Hold to talk | h+Enter, followed by your query (no need to say "Alexa..") |
| Simulate button release | h+Enter |
| Stop an interaction | s+Enter |
Playback controls
| Action | Command |
|---|---|
| Play | 1 |
| Pause | 2 |
| Next | 3 |
| Previous | 4 |
Settings
| Action | Command |
|---|---|
| View available settings | c+Enter |
| Adjust speaker settings | p+Enter |
| Report firmware version | f+Enter |
| Help screen | i+Enter |
| Reset device | k+Enter This command erases any data stored on the device. You must reauthorize your sample application. It also exits the application. |
| Quit | q+Enter |
Setting options
The following table shows how to view the different settings that you can modify in the sample application.
| Action | Command |
|---|---|
| Language options | 1+Enter |
| Do Not Disturb options | 2+Enter |
| Wake word confirmation | 3+Enter |
| Speech confirmation | 4+Enter |
| Time zone options | 5+Enter |
| Network options | 6+Enter |
| Alarm Volume Ramp | 7+Enter |
| Settings Options | q+Enter |
Language options
The following table shows the language options that change the default locale in the sample application.
| Action | Command |
|---|---|
| de-DE | 1+Enter |
| en-AU | 2+Enter |
| en-CA | 3+Enter |
| en-GB | 4+Enter |
| en-IN | 5+Enter |
| en-US | 6+Enter |
| es-ES | 7+Enter |
| es-MX | 8+Enter |
| es-US | 9+Enter |
| fr-CA | 10+Enter |
| fr-FR | 11+Enter |
| hi-IN | 12+Enter |
| it-IT | 13+Enter |
| ja-JP | 14+Enter |
| pt-BR | 15+Enter |
| ["en-CA","fr-CA"] | 16+Enter |
| ["fr-CA","en-CA"] | 17+Enter |
Do Not Disturb configuration
The following table shows the commands for how to enable or disable Do Not Disturb.
| Action | Command |
|---|---|
| Enable Do Not Disturb | E+Enter |
| Disable Do Not Disturb | D+Enter |
Wake word confirmation configuration
The following table shows the enable or disable wake word confirmation configuration.
| Action | Command |
|---|---|
| Enable Wake Word Confirmation Configuration | E+Enter |
| Disable Wake Word Confirmation Configuration | D+Enter |
Speech confirmation configuration
The following table shows the enable or disable speech confirmation.
| Action | Command |
|---|---|
| Enable Speech confirmation | E+Enter |
| Disable Speech confirmation | D+Enter |
TimeZone configuration
The following table shows how you can modify the default timeZone configuration.
| Action | Command |
|---|---|
| America/Vancouver | 1+Enter |
| America/Edmonton | 2+Enter |
| America/Winnipeg | 3+Enter |
| America/Toronto | 4+Enter |
| America/Halifax | 5+Enter |
| America/St_Johns | 6+Enter |
Network info configuration
The following table shows how to update the network information about your device.
| Action | Command |
|---|---|
| Display current network info | 1+Enter |
| Set connection type | 2+Enter |
| Set the network name (ESSID) | 3+Enter |
| Set physical access point name | 4+Enter |
| Set IP Address | 5+Enter |
| Set subnet mask | 6+Enter |
| Set MAC address | 7+Enter |
| Set DHCP server address | 8+Enter |
| Set static IP settings | 9+Enter |
Alarm volume ramp
The following tables shows how to enable or disable ascending alarms.
| Action | Command |
|---|---|
| Enable Alarm volume ramp | E+Enter |
| Disable Alarm volume ramp | D+Enter |
Sample application debug mode
You can run the sample application in debug mode to troubleshoot your device and run diagnostic tools. If the sample application is running in debug mode, you see the following message when the application first starts.
SDK Version 3.0.0

WARNING! THIS DEVICE HAS BEEN COMPILED IN DEBUG MODE.

RELEASING A PRODUCTION DEVICE IN DEBUG MODE MAY IMPACT DEVICE PERFORMANCE,
DOES NOT COMPLY WITH THE AVS SECURITY REQUIREMENTS,
AND COULD RESULT IN SUSPENSION OR TERMINATION OF THE ALEXA SERVICE ON YOUR DEVICES.
Troubleshooting the console sample application
Issue: Can't hear sound
Symptom
You don't hear any sound.
Try this
Make sure that both your microphone and speakers are working.
Issue: sample application is unresponsive
Symptom
Alexa isn't responding or the sample application appears stuck or displays error messages when you try to speak.
Try this
Press s+Enter to stop the interaction. You can also press q+Enter to exit the sample application.
For more details about how to troubleshoot other common issues, see the Troubleshooting AVS Device SDK Common Issues.
Device setup
You can use the DeviceSetup Interface to inform AVS that a device has finished setting up. You can use this interface to trigger an out-of-box onboarding experience, such as a first-time setup walk through process.
To see how this process works, you can simulate the device setup process in the AVS Device SDK Console Sample Application menu.
To simulate a device setup
- Start the sample application.
- To open the settings menu, press i+Enter.
-
To send a
SetupCompletedevent to AVS, press v+Enter.You can use this sample experience as a reference to build your own device setup experience.
Related topics
- Get Started with Alexa Voice Service Device SDK
- The AVS Device SDK Console Sample Application Overview
Last updated: Dec 20, 2023