
Step 7: Update the Fire TV Skill Sections (VSK Fire TV)
Now that you have a Fire TV app uploaded into the developer console with the appropriate security profile, as well as a Lambda function in AWS, you can complete the other fields in the video skill configuration and associate your Fire TV app with the video skill.
Update Video Skill to Enable Fire TV Support
In this step, you'll associate your video skill with a Fire TV app:
- Return to your video skill in the Alexa Console.
- Click Edit next to your video skill.
-
Complete the following sections:
- "1. Video Skill Service Endpoint"
- "2. Country Specific Configuration"
- "3. Language Specific Configuration"
- "4. Fire TV Support"
- Distribution Tab
Details for each section are provided below.
"1. Video Skill Service Endpoint"
-
In the Default endpoint field, enter your Lambda ARN (which you copied in Step 6: Create and Deploy a Lambda Package). The Lamba ARN tells the video skill which Lambda function to send directives to.
-
In the "Pick a geographical region … " section, you can select different Lambda ARNs based on different regions to the reduce the latency between Alexa and your Lambda. Based the your AWS region you selected earlier, paste your ARN into one of these regions.

Configuring your video skill with your Lambda ARN
"2. Country Specific Configuration"
In this section, select a country for your skill. By default, a country should already be selected (e.g., United States). If your video skill will be available in more than one country, click Add Country and add the additional countries.
Below the country you will see a sub-section titled "A. [Country name] Configuration." This lists the Catalog details for the country. If you added more countries, you see additional Catalog details for each country. For example, if you added both United States and Canada for your video skill, you see two Catalog subsections as follows:
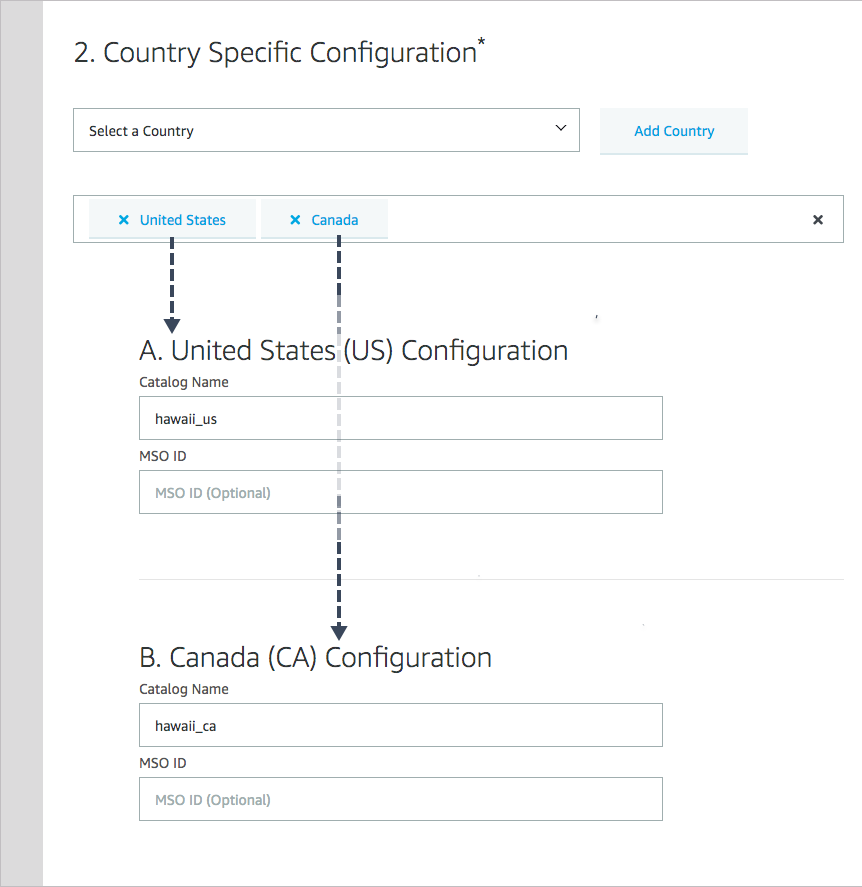
In the Catalog Name field, enter the name of your catalog (for each country).
As noted in the introduction, Catalog integration is required for video skills. When users request a media title, Amazon will look within your catalog for title matches and send you the corresponding identifiers. For more details about catalog integration, including the CDF format, see the Catalog documentation.
If you're using the sample Fire TV app, enter
tms for your catalog name. This catalog name is the IMDb catalog. As such, you'll be able to search for nearly every movie or TV show and get a result. The sample app will always play the same sample videos, though.Ignore the MSO ID, as this field is not used for video skills on Fire TV apps. (MSO stands for multiple-system operator and is used for live TV integration of video skills into set-top boxes.)
"3. Language Specific Configuration"
In this section, select the language for your video skill, if necessary. Languages corresponding to the countries you selected earlier will automatically be added, but you can add additional languages as desired by clicking Add Language. Each additional language you enter will create a corresponding subsection with Skill Invocation details.
For example, suppose your video skill is available in both United States and Canada. As a result, two languages are selected by default: en-US and en-CA. As a result, you see two subsections to configure the skill invocation for each of these languages: "A. English (United States): en-US Configuration" and "B. English (Canada): en-CA Configuration," as shown in the following screenshot:
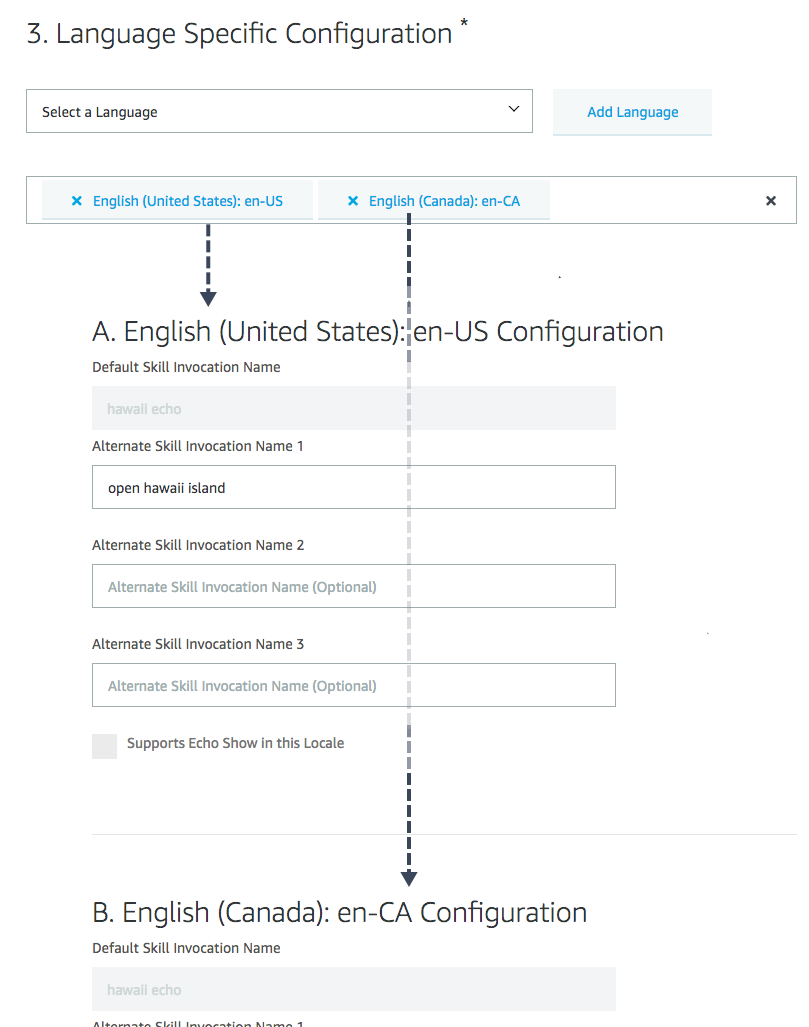
These subsections allow you to customize the video skill invocation names and image assets for each language. For example, suppose your video skill name differs between the two locations, or has a different logo image — if so, you could customize the invocation and display appropriately through these subsections.
In the Alternate Skill Invocation boxes, enter additional ways to invoke your skill. By default, your video skill can be invoked by the name you gave it when you created the skill. But you can create alternate names here as well.
For example, suppose your skill was named XYZ. Users could say, "Play the movie Big Buck Bunny on XYZ" to invoke your video skill. (This utterance explicitly targets your skill.) If you added an alternate skill invocation of "ACME," then users could say "Play the movie Big Buck Bunny on ACME" and Alexa would target your video skill through this invocation as well.
"4. Fire TV Support"
- In the "4. Fire TV Support" section, select the Enable Fire TV Support check box.
-
Select your Fire TV app that you want to pair with this video skill. All Fire TV apps from the Apps section of the developer console automatically appear here. Selecting the app automatically populates the Client ID too.
For example, if you have a Fire TV app under Apps & Services > My Apps, the app will appear in this Fire TV Application box for you to select. When you pair your video skill with a Fire TV app, the skill and app become associated together. When you launch your Fire TV app, the associated video skill automatically gets enabled. Your skill will disappear from the Alexa skill store in the Alexa app and will instead become part of Fire TV's video skill interaction (from a user's perspective).
In other words, Alexa-enabling your app will be seamless from the user's perspective — users will not need to look for your skill in the Alexa skill store to use voice with your skill. This greatly increases adoption of voice functionality among users.

Pairing your video skill with a Fire TV app After you select the app, the Client ID associated with the app automatically gets populated. Login with Amazon uses this Client ID to identify and authorize your application. Login with Amazon authorizes the skill to communicate with your app.
(Note that the Client ID here won't be the same as your security profile's Client ID. If you go to your security profile and click the Web Settings tab, you will see another Client ID listed. A security profile can have multiple Client IDs associated with it. And actually, you will need to reselect the Client ID here after you push your app to Live App Testing (LAT) — this is done in a later step.)
After you select a Fire TV application here, the pairing of the skill with the app is permanent and cannot be undone.
Also note that a video skill can support only one Fire TV app. You cannot associate a single video skill with multiple Fire TV apps.
-
Click the Save button.
After you complete the Fire TV Support section, the Account Linking and Permissions tabs become inaccessible. They are not used in Fire TV skill.
Distribution Tab
-
After saving your changes on the Build tab, click the Distribution tab from the top navigation and ensure that all fields are filled in, including all icons. You can modify these fields later if needed (since you don't need to officially publish your skill to test it), but at least put some stub values in each field for now. The following table describes each field.
Note: Currently, video skills are not shown in the Skills area of the Alexa app (which you can also browse on Amazon.com here). Customers won't need to manually browse the Alexa skills and enable them. Even so, you should still complete the description and other fields for your video skill.Fire TV will automatically enable skills on Fire TV the first time users launch your app. This is what pairing your video skill with your Fire TV app accomplishes.The following table describes each of the fields:
Distribution Fields Field Description Public Name The name of the skill shown to customers in the Alexa app. Use your app's name (for example, "ACME"). One Sentence Description A quick at-a-glance sentence that describes the skill or what customers can do with it (for example, "This skill allows you to use your voice to interact with ACME."). This text appears as the first line in your Alexa skill's description. Detailed Description Enter a fuller description of the skill's purpose, features, and functionality (such as "Enjoy a hands-free experience to interact with your smart TV to discover new content.") Describe how to use the skill (such as "Search for your favorite shows by name, control playback with common commands, change channels, and more."). What's new Release notes for your skill. (For example, "First release of skill.") Example Phrases Sample utterances users can say in your app. Put each utterance on a new line. The sample phrases should correspond with the video skill functionality you implemented and will appear on your skill's description. For example: - "Alexa, search for [TV show] on ACME."
- "Alexa, watch [movie] on ACME."
- "Alexa, tune to ACME."
- "Alexa, rewind 30 seconds."
- Alexa, show episodes of [TV show] on ACME.
Small Skill Icon A 108 x 108px icon (PNG or JPG) to represent your skill in the Alexa app. The image must accommodate a circular design. If you don't have an image, either use the stock image below or create one using the Alexa Skill Icon Builder. (Right-click the image below and save it to your computer.) 
Large Skill Icon A 512 x 512px icon (PNG or JPG) that provides a larger version of the same icon. This icon appears in the Alexa Skills section of Amazon.com. If you don't have an image, either use the stock image below or create one using the Alexa Skill Icon Builder. (Right-click the image below and save it to your computer.) 
Category Select Video Keywords Simple search words that describe this skill. For example, you might list variations on your app's name and the most popular shows in your app. This helps customers find the skill quickly and easily. Use spaces or commas in between each search term. Privacy Policy URL Link to the privacy policy that applies to this skill. (If you don't have one, link to your website for now.) Terms of Use URL Link to the terms of use document for this skill. (If you don't have one, link to your website for now.) - When you finish with the required fields, click Save and continue. You'll be presented with the next screen in the left navigation: Privacy & Compliance.
- Complete the Privacy & Compliance fields. (Note that you must include some content in Testing Instructions.)
- When you're finished on this screen, click Save and continue. You'll be presented with the next screen in the left navigation: Availability.
- Complete the Availability fields. Make sure Public is selected and select the appropriate locations (select the same regional availability for your video skill as your app's availability). Then click Save and continue.
-
You're taken to the Certification tab, specifically to to the "Validation" side tab. Assuming you completed all the required fields, you should a success message indicating there are no errors.

Video skill configured and ready for testing If there are errors (such as a missing skill image), you'll be prompted to fix them. After you fix them, return to the Certification tab and click Run.
There's no need to move through the Functional test and Submission pages. Also, you don't need to submit your video skill at this time. You can test your skill while you are still developing it.
Next Steps
Now that you've finished all the setup, it's time to see the video skill in action with sample utterances and log messages. Continue on to the next step: Step 8: Test Your Skill and Observe Logs
(If you run into any issues that prevent you from continuing, see Troubleshooting for Cloudside Integrations.)
Last updated: Oct 13, 2021