
Render the Video List
Now we want to render video cards for each item in our islandVideos and underwaterVideos arrays. There are multiple ways we can do this:
- Using JavaScript logic such as the .map function to iterate through the array in JSX and create a component for each item.
- Using a React Native FlatList component which takes in a array object.
In this case, we will choose option 2, the FlatList, as it is more performant than .map and arguably a bit simpler.
Create FlatList
- First, import FlatList, View, and StyleSheet from 'react-native' in
LandingScreen.tsx.
import { FlatList, View, StyleSheet } from 'react-native';
- Replace the VideoCard component with a FlatList component.
- Add the
horizontalprop to display the items horizontally. - Add the
dataprop to FlatList and set it toislandVideos. This is the source data that the FlatList will render.
<FlatList
  horizontal
  data={islandVideos}
/>
- Add the
renderItemprop. It passes anitemfrom thedataprop (in our case, a single video element) to an arrow function, where you specify the JSX that will render that item. - Add the VideoCard component to
renderItemand wrap it in a View. - Add the
keyprop to VideoCard, which is used by FlatList to track items (the key must be unique). You could also add akeyExtractorprop to FlatList, instead of specifying akeyin VideoCard. You can learn more about this in the React Native FlatList documentation. - Add the
title,description, andimgURLprops to the VideoCard component, and pass in the corresponding fields fromitem. - Create a second FlatList for the
underwaterVideos. - Add a
Textcomponent to each row to label the category.
<Text>Costa Rica Islands</Text>
<FlatList
  horizontal
  data={islandVideos}
  renderItem={({item}) => (
    <View>
      <VideoCard
        key={item.id}
        title={item.title}
        description={item.description}
        imgURL={item.imgURL}
      />
    </View>
  )}
/>
<Text>Costa Rica Underwater</Text>
<FlatList
  horizontal
  data={underwaterVideos}
  renderItem={({item}) => (
    <View>
      <VideoCard
        key={item.id}
        title={item.title}
        description={item.description}
        imgURL={item.imgURL}
      />
    </View>
  )}
/>
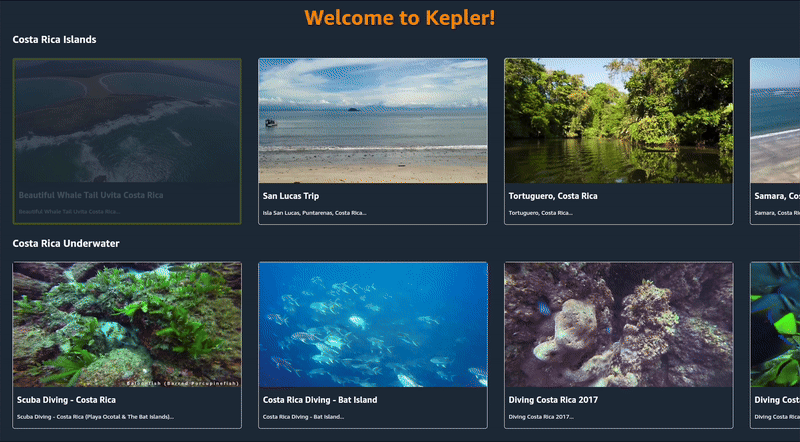
- Refresh the app and verify the VideoCards are rendering.
Add Styling
Let's add some styling to make the VideoCards look nicer on the screen.
- After the LandingScreen arrow function, create a StyleSheet with styles called
flatList,itemContainerandcategoryTitle. These styles will give our cards some spacing and make our category title look a bit nicer.
const styles = StyleSheet.create({
  flatList: {
    padding: 10,
  },
  itemContainer: {
    margin: 10,
  },
  categoryTitle: {
    fontSize: 24,
    fontWeight: 'bold',
    color: 'white',
    marginLeft: 30,
  },
});
- Now add the
flatListstyle to FlatList, theitemContainerstyle to View and thecategoryTitleto the Text.
<Text style={styles.categoryTitle}>Costa Rica Islands</Text>
<FlatList
  style={styles.flatList}
  horizontal
  data={islandVideos}
  renderItem={({item}) => (
    <View style={styles.itemContainer}>
      <VideoCard
        key={item.id}
        title={item.title}
        description={item.description}
        imgURL={item.imgURL}
      />
    </View>
  )}
/>
Wrap rows in TVFocusGuideView
Now in order to ensure that focus is handled between the 2 rows we can use the TVFocusGuideView component. The component enables your app to find, recover and remembering the focus on multiple visits.
- Import
TVFocusGuideViewfrom@amazon-devices/react-native-kepler.
import {TVFocusGuideView} from '@amazon-devices/react-native-kepler';
- Wrap the FlatList in the TVFocusGuideView and set autoFocus to true, this enables TVFocusGuide to automatically manage focus for you.
The updated LandingScreen.tsx should look like this:
import React, {useState, useEffect} from 'react';
import {FlatList, StyleSheet, View, Text} from 'react-native';
import Header from '../components/Header';
import VideoCard from '../components/VideoCard';
import {TVFocusGuideView} from '@amazon-devices/react-native-kepler';

interface IVideo {
  id: string;
  title: string;
  description: string;
  duration: number;
  thumbURL: string;
  imgURL: string;
  videoURL: string;
  categories: Array<string>;
  channel_id: number;
}

const LandingScreen = () => {
  const [islandVideos, setIslandVideos] = useState<IVideo[]>([]);
  const [underwaterVideos, setUnderwaterVideos] = useState<IVideo[]>([]);

  const url = 'https://d2ob7xfxpe6plv.cloudfront.net/TestData.json';

  const getAllVideos = () => {
    fetch(url)
      .then((response) => response.json())
      .then((data) => {
        // Filter videos for each category
        const islands = data.testData.filter(
          (video: IVideo) =>
            video.categories && video.categories.includes('Costa Rica Islands'),
        );

        const underwater = data.testData.filter(
          (video: IVideo) =>
            video.categories &&
            video.categories.includes('Costa Rica Underwater'),
        );

        setIslandVideos(islands);
        setUnderwaterVideos(underwater);
      })
      .catch((error) => {
        console.log(error);
      });
  };

  useEffect(() => {
    getAllVideos();
  }, []);

  return (
    <>
      <Header />
      <TVFocusGuideView autoFocus={true}>
        <Text style={styles.categoryTitle}>Costa Rica Islands</Text>
        <FlatList
          style={styles.flatList}
          horizontal
          data={islandVideos}
          renderItem={({item}) => (
            <View style={styles.itemContainer}>
              <VideoCard
                title={item.title}
                description={item.description}
                imgURL={item.imgURL}
                pressFunction={() => {}}
              />
            </View>
          )}
        />
      </TVFocusGuideView>
      <TVFocusGuideView autoFocus={true}>
        <Text style={styles.categoryTitle}>Costa Rica Underwater</Text>
        <FlatList
          style={styles.flatList}
          horizontal
          data={underwaterVideos}
          renderItem={({item}) => (
            <View style={styles.itemContainer}>
              <VideoCard
                title={item.title}
                description={item.description}
                imgURL={item.imgURL}
                pressFunction={() => {}}
              />
            </View>
          )}
        />
      </TVFocusGuideView>
    </>
  );
};

const styles = StyleSheet.create({
  flatList: {
    padding: 10,
  },
  itemContainer: {
    margin: 10,
  },
  categoryTitle: {
    fontSize: 24,
    fontWeight: 'bold',
    color: 'white',
    marginLeft: 30,
  },
});

export default LandingScreen;
- Refresh the app, and navigate from one row to another. Notice that focus is retained on the item you navigated from rather than moving to a corresponding item in the new row? This behavior is controlled by the TVFocusGuideView component!
Congratulations! We have successfully completed Part 1 of this lab where we built the foundation of our video application. We've created reusable components, implemented data fetching, and added interactivity to our VideoCards. In Part 2, we'll expand our application's capabilities.
Last updated: Feb 09, 2026