
App Performance Best Practices
Since React Native for Vega apps are just React Native apps, public documentation on React Native best practices also applies. Consider these key best practices when building React Native for Vega apps, along with key differences for Vega compared to iOS or Android.
Video overview
Watch this video for an overview of improving app performance on Vega.
Avoiding re-renders and redefinitions
memo
React's memo can improve performance, preventing unnecessary re-renders of functional components. By default, React re-renders a component whenever its parent re-renders, even if its props haven't changed. React's memo optimizes performance by shallowly comparing the previous and new props, skipping a re-render if they are the same. This optimization is beneficial for components that receive stable props that don't need updating frequently, such as list items, buttons, or UI elements with heavy rendering logic. When combined with useCallback and useMemo, memo can also minimize wasted renders, improving efficiency in React apps.
By default, memo performs a shallow comparison of props using the Object.is static method to determine if a component should re-render. In some cases, you may need to provide your own arePropsEqual function to customize this comparison. memo can be used when passing inline styles or anonymously defining prop values to your function component. In these cases, the props are equal by value but not in memory, so the Object.is() comparison marks them as not equal. A customized comparison is useful when dealing with complex objects or functions as props, where a shallow comparison isn't sufficient. A custom comparison function provides finer control over when a component should update, improving performance in scenarios where you require deep comparisons or specific conditions.
React Native has two useful tools to investigate React component re-renders: The "Record why each component rendered while profiling" flag from the react-devtools profiler, and the community package why-did-you-render (WDYR).
It's best to wrap the user-defined function components in the memo API. However, using memo and useMemo everywhere may not be useful. See React's article, Should you add memo everywhere? for when and how to use memo and useMemo.
React compiler and eslint-plugin-react-compiler
In React 19 release candidate (RC), React has introduced a static React code compiler that automatically applies memoization through memo, useMemo, and useCallback. The compiler assumes your app follows the Rules of React, is semantic JavaScript or TypeScript, and tests for nullable and optional values and properties before accessing them. While React says "the compiler is experimental and has many rough edges", we recommend that you onboard to the react compiler's ESLint plugin, eslint-plugin-react-compiler. This plugin does not require upgrading to React 19. To onboard, see Installing eslint-plugin-react-hooks.
Strict mode
Wrapping a React Native app in <StrictMode> is beneficial because it helps identify potential issues in the app during development. <StrictMode> runs additional checks and warns about deprecated lifecycle methods, unsafe side effects, and other potential problems that could lead to performance issues or bugs. It also double-invokes certain functions, like component constructors and useEffect callbacks, so no unintended side effects result. This debugging tool helps developers catch problems early, leading to more stable and efficient apps. <StrictMode> doesn't impact production builds, but using it in development is a best practice, and prepares the app for future React and React Native updates.
Suspense and lazy
React's lazy component and <Suspense> boundary can significantly improve startup time and overall app performance. By enabling code splitting, React's lazy allows components to load only when needed, reducing the initial bundle size and speeding up the app's initial render. React's <Suspense> works alongside lazy by making the app "suspend" rendering until the necessary components load, creating a smooth user experience without blocking the UI. This approach not only optimizes app startup times but also enhances bundle loading efficiency, loading only the required code for each view.
useCallback
Using useCallback in React improves performance by memoizing function instances, preventing unnecessary recreations on each render. useCallback is beneficial when passing functions as props to child components. This helps avoid unnecessary re-renders when those components rely on referential equality checks. For instance, when it's wrapped in React.memo. useCallback helps prevent unintended reexecutions of side effects where functions are effect dependencies (useEffect). Use useCallback judiciously, since excessive use may increase memory usage and complexity. When used correctly, useCallback optimizes rendering efficiency and reduces performance overhead in React apps.
Add items to the dependency array for useCallback so the memoized function has access to the latest values of any reactive dependencies it references. Omitting dependencies can lead to stale closures, where the function continues to use outdated values from previous renders, which may cause unexpected behavior or bugs.
useEffect()
Although not specific to React Native, how you use React's useEffect can impact performance. It is worth reading React's article, You Might Not Need an Effect. As always, make sure your useEffect dependency array contains all reactive values (props, state, variables, and functions declared within your component body, etc.). Using the eslint-plugin-react-compiler helps you detect missing dependencies in your useEffect's dependency array.
useMemo
React's useMemo improves performance by memoizing the result of expensive computations, preventing unnecessary recalculations on every render. Without useMemo, functions that perform complex operations, such as filtering large lists, performing mathematical calculations, or processing data, would execute on every render. These functions would execute even if their dependencies haven't changed. By wrapping such computations in useMemo, React only re-evaluates them when their dependencies update, reducing CPU usage and improving responsiveness. Using useMemo works well in scenarios where a component frequently re-renders due to unrelated state changes. Use useMemo selectively, since excessive use can add memory overhead without significant benefits.
Add items to the dependency array for useMemo to recalculate the memoized value when changing dependencies. If you omit dependencies, your values may be stale or incorrect. Unnecessary dependencies can cause unnecessary recalculations, reducing performance.
useState and useTransition
Minimizing React's useState usage can improve performance by reducing unnecessary re-renders. Every state update triggers a re-render, so excessive state management can lead to performance bottlenecks, especially in complex components. You can make components more efficient by using useState less. You can use useState less is by using refs (useRef) for mutable values that don't affect rendering, or by deriving state instead of storing redundant values. Avoiding useState can make components more efficient. The useTransition hook enhances performance by prioritizing urgent state updates, such as user input. At the same time, it defers less critical state updates such as search results. Using useTransition also prevents UI blocking, for a smoother experience by keeping interactions responsive even during expensive state transitions. Wrapping set state calls in the startTransition function from useTransition allows React to interrupt renders for stale state updates, and prioritizes the render for the most recent state update.
Sample app
Before optimization
import React, { useState, useEffect } from 'react';
import {
  View,
  Text,
  Button,
  FlatList,
  TouchableOpacity
} from 'react-native';

// Bad practice: Non-memoized data and function
const BadPracticeApp = () => {
  const [count, setCount] = useState(0);
  const [selectedItem, setSelectedItem] = useState(null);

  // Expensive calculation on each render, and new function instance on BadPracticeApp level re-render
  const sumOfSquares = (num) => {
    console.log('Calculating sum of squares...');
    return Array.from(
      { length: num },
      (_, i) => (i + 1) ** 2
    ).reduce((acc, val) => acc + val, 0);
  };

  // data is recreated on every BadPracticeApp re-render
  const data = Array.from(
    { length: 50 },
    (_, i) => `Item ${i + 1}`
  );

  return (
    <View style={{ flex: 1, padding: 20 }}>
      <Text>Sum of squares: {sumOfSquares(10)}</Text>
      <Button
        title="Increase Count"
        onPress={() => setCount(count + 1)}
      />
      <FlatList
        data={data}
        keyExtractor={(item) => item} // anonymous function used, so new function instance created on every re-render
        renderItem={({ item }) => (
          <TouchableOpacity onPress={() => setSelectedItem(item)}>
            <Text
              style={{
                padding: 10,
                backgroundColor:
                  item === selectedItem ? 'lightblue' : 'white'
              }}>
              {item}
            </Text>
          </TouchableOpacity>
        )} // anonymous function used, so new function instance created on every re-render and returned function component is not memoized
      />
    </View>
  );
};

export default BadPracticeApp;
After optimization
import React, {
  memo,
  StrictMode,
  useState,
  useMemo,
  useCallback,
  useTransition
} from 'react';
import {
  View,
  Text,
  Button,
  FlatList,
  TouchableOpacity,
  ActivityIndicator
} from 'react-native';

// Memoized Item component to prevent unnecessary re-renders
const Item = memo(({ item, isSelected, onPress }) => {
  return (
    <TouchableOpacity onPress={() => onPress(item)}>
      <Text
        style={{
          padding: 10,
          backgroundColor: isSelected ? 'lightblue' : 'white'
        }}>
        {item}
      </Text>
    </TouchableOpacity>
  );
});

const BestPracticeApp = () => {
  const [count, setCount] = useState(0);
  const [selectedItem, setSelectedItem] = useState(null);
  const [isPending, startTransition] = useTransition(); // For handling non-urgent updates

  // Memoize the expensive calculation
  const sumOfSquares = useMemo(() => {
    console.log('Calculating sum of squares...');
    return Array.from(
      { length: 10 },
      (_, i) => (i + 1) ** 2
    ).reduce((acc, val) => acc + val, 0);
  }, []); // Only recalculated if dependencies change (none in this case)

  // Memoize the data to avoid unnecessary array recreation
  const data = useMemo(
    () => Array.from({ length: 50 }, (_, i) => `Item ${i + 1}`),
    []
  );

  // Memoize the renderItem function to avoid unnecessary recreations
  const renderItem = useCallback(
    ({ item }) => (
      <Item
        item={item}
        isSelected={item === selectedItem}
        onPress={handleSelectItem}
      />
    ),
    [selectedItem] // Only recreated when selectedItem changes
  );

  // Simulate a delayed process (e.g., fetching additional data) when an item is selected
  const handleSelectItem = (item) => {
    startTransition(() => {
      setSelectedItem(item); // Mark the selected item
    });
  };

  return (
    <StrictMode>
      <View style={{ flex: 1, padding: 20 }}>
        <Text>Sum of squares: {sumOfSquares}</Text>
        <Button
          title="Increase Count"
          onPress={() => setCount(count + 1)}
        />
        <Text>Count: {count}</Text>

        <FlatList
          data={data}
          keyExtractor={(item) => item}
          renderItem={renderItem}
          getItemLayout={(data, index) => ({
            length: 50,
            offset: 50 * index,
            index
          })}
        />

        {isPending && (
          <ActivityIndicator size="large" color="#0000ff" />
        )}
      </View>
    </StrictMode>
  );
};

export default BestPracticeApp;
How to handle large lists
React Native offers quite a few different list components.
ScrollView
Within the context of performance, it is typically better to use the FlatList component over the ScrollView component since FlatList virtualization renders child components lazily. The ScrollView component renders all its React child components at once. For that reason, using many child components for your ScrollView component impacts performance. Rendering slows down and memory usage increases. However, for lists with a smaller data set, using ScrollView is perfectly acceptable. Remember to memoize the ScrollView and its children components accordingly.
FlatList
Setting the FlatList required data and renderItem props don't unlock all the performance benefits of using a FlatList component. Set other props in your FlatList component to improve your app's fluidity (FPS), CPU utilization, and memory usage. Apply the best practices outlined in React Native's official Optimizing FlatList Configuration article. In our testing, we've found getItemLayout, windowSize, and initialNumToRender props as well as adding memoization to child components especially important for fluidity and CPU utilization. If your app involves nested FlatList usage to support vertical and horizontal scrolling, you should memoize your nested FlatList components.
FlashList
Vega fully supports Shopify's FlashList, which provides a more performant alternative to React Native's FlatList component. Swapping from FlatList to FlashList is trivial, since both have the same component props. However, some FlatList specific props no longer work for FlashList. These props include windowSize, getItemLayout, initialNumToRender, maxToRenderPerBatch, and updateCellsBatchingPeriod. You can find a full list at the end of this usage article.
Set a few key props, and follow these best practices, to unlock better performance for FlashList.
- First, set the
estimatedItemSizeprop for yourFlashList. Using theestimatedItemSizeprop inFlashListimproves performance by allowing the list to prerender the appropriate number of items, minimizing blank space and load time. It also increases responsiveness during fast scrolls by avoiding unnecessary re-renders and large render trees. For more details, you can read this Estimated Item Size Prop article. - Item recycling in
FlashListimproves performance by reusing off-screen components instead of destroying them, preventing unnecessary re-renders and reducing memory usage. To optimize this recycling, avoid usinguseStatefor dynamic properties in recycled components, since state values from previous items can carry over, leading to inefficiencies. For more details, see Recycling. - Remove the key prop from item components and their nested components. For more details, see this Remove key prop article.
- If you have different types of cell components and they differ quite a lot, consider leveraging the
getItemTypeprop. For more details, see thisgetItemTypearticle.
The image component
React Native's Image component on iOS and Android does not provide out-of-box performance optimizations, such as caching. React Native developers usually use a community package such as react-native-fast-image or expo-image for memory or disk level caching for images in their React Native app. For React Native for Vega, we've built caching mechanisms throughout the native implementation of the Image component. They perform like an Image from react-native-fast-image or expo-image.
We recommend you have the same image asset available in several sizes and resolutions for your use case. For example, if rendering Image components within a FlatList or ScrollView component, it's better to use a cropped version or a thumbnail sized asset. Cropped or thumbnail sized assets spend fewer CPU cycles decoding your image and use less memory for raw image assets.
The Animated library
React Native provides an Animated library for fluid animations on React Native's core components. Animations are expensive operations in React Native. Frame by frame, the JS thread computes updates to the animation to send over the bridge to the native side to generate the frame. Using animation can also affect other processes running at the same time. This may overload the JS thread so it cannot process timers, executing React hooks, component updates, or other processes. To avoid overloading the JS thread, set the useNativeDriver prop on your animation to true. useNativeDriver is set to true in native animations, while useNativeDriver is set to false in JS animations. For more information, see Using the native driver.
We recommend that you schedule the animation with InteractionManager. InteractionManager.runAfterInteractions() takes a callback function, or a PromiseTask object, which executes only after completing the current animations or other interactions. Delaying the execution newly scheduled animations reduces the chance of overloading the JS thread, and improves app responsiveness and fluidity.
Optimizing your focus management UI
When a component gains focus, it invokes the onFocus callback. When a component loses focus, it invokes the onBlur callback. This is how to drive UI changes while the user navigates through your app. Keep your onFocus and onBlur handler functions as simple as possible. There are several ways you can simplify these handler functions.
If your component draws a border around the focused item, use conditional styling. For example, styles={isFocused ? styles.focusedStyle : styles.blurredStyle}. Make sure every combination of your onFocus and onBlur invocation causes at most one React render cycle. This way the JS thread performs minimal work and the user navigation remains responsive.
If your component requires more complex UI updates when gaining a component focus, use native animation so the JS thread doesn't do all the work. Examples of such a UI updates are enlarging the selected view, text, or image, or changing the opacity. To optimize further, add a debounce mechanism where this native animation starts only if the user focuses on the item for over a set amount of time. Your animation will be delayed a bit, but using a debounce mechanism prevents the animation from kicking off for every focused item when the user navigates through your app quickly.
Listeners, event subscriptions, and timers
Some Turbo Modules (TMs) such as VegaAppState, DeviceInfo, or Keyboard help you register listeners on certain events. These listeners may be created within a useEffect hook. To avoid any dangling memory, clean up your listeners in the return function of your useEffect hook.
useEffect(() => {
  const keyboardShowListenerHandler = Keyboard.addListener(
    'keyboardDidShow',
    handleKeyboardDidShow
  );
  return () => {
    keyboardShowListenerHandler.remove();
  };
}, []);
Reducing overdraw
Your React Native for Vega app is like a canvas. When you have nested views with different background colors occupying the same space, you're painting over the same area over and over. For example, if a full-screen gray view covers a full-screen black view, the black layer becomes "fully overdrawn." The system processes it, but it's invisible. While some overdraw is acceptable, especially if it's partial, minimizing these redundant draw operations improves performance. The goal is to draw each pixel as few times as possible per frame.
You can detect overdraw by running your app with the ?SHOW_OVERDRAWN=true launch query argument.
vda shell vmsgr send "pkg://com.amazon.keplersampleapp.main?SHOW_OVERDRAWN=true"
UI elements on your canvas now contain a semi-transparent tint. The resulting color indicates how many times a canvas was overdrawn.
- True color: No overdraw
- Blue color: Overdrawn 1 time.
- Green color: Overdrawn 2 times.
- Pink color: Overdrawn 3 times.
- Red color: Overdrawn 4 or more times.
Ideally, no part of your app should contain a pink or red tint, meaning don't overdraw it with 3 or more layers.
Reducing bundle size
With any React app, it's crucial to minimize your bundle size for optimizing memory usage and improving app launch time. react-native-bundle-visualizer can help identify expensive import statements or unused dependencies. Once it's installed, you can run the following command to automatically open an HTML file in your browser for you to interactively view.
npx react-native-bundle-visualizer
Here's a sample React Native for Vega app bundle that is trying to use debounce from lodash via import { debounce } from 'lodash';. After this import statement, you can visualize the bundle like this.
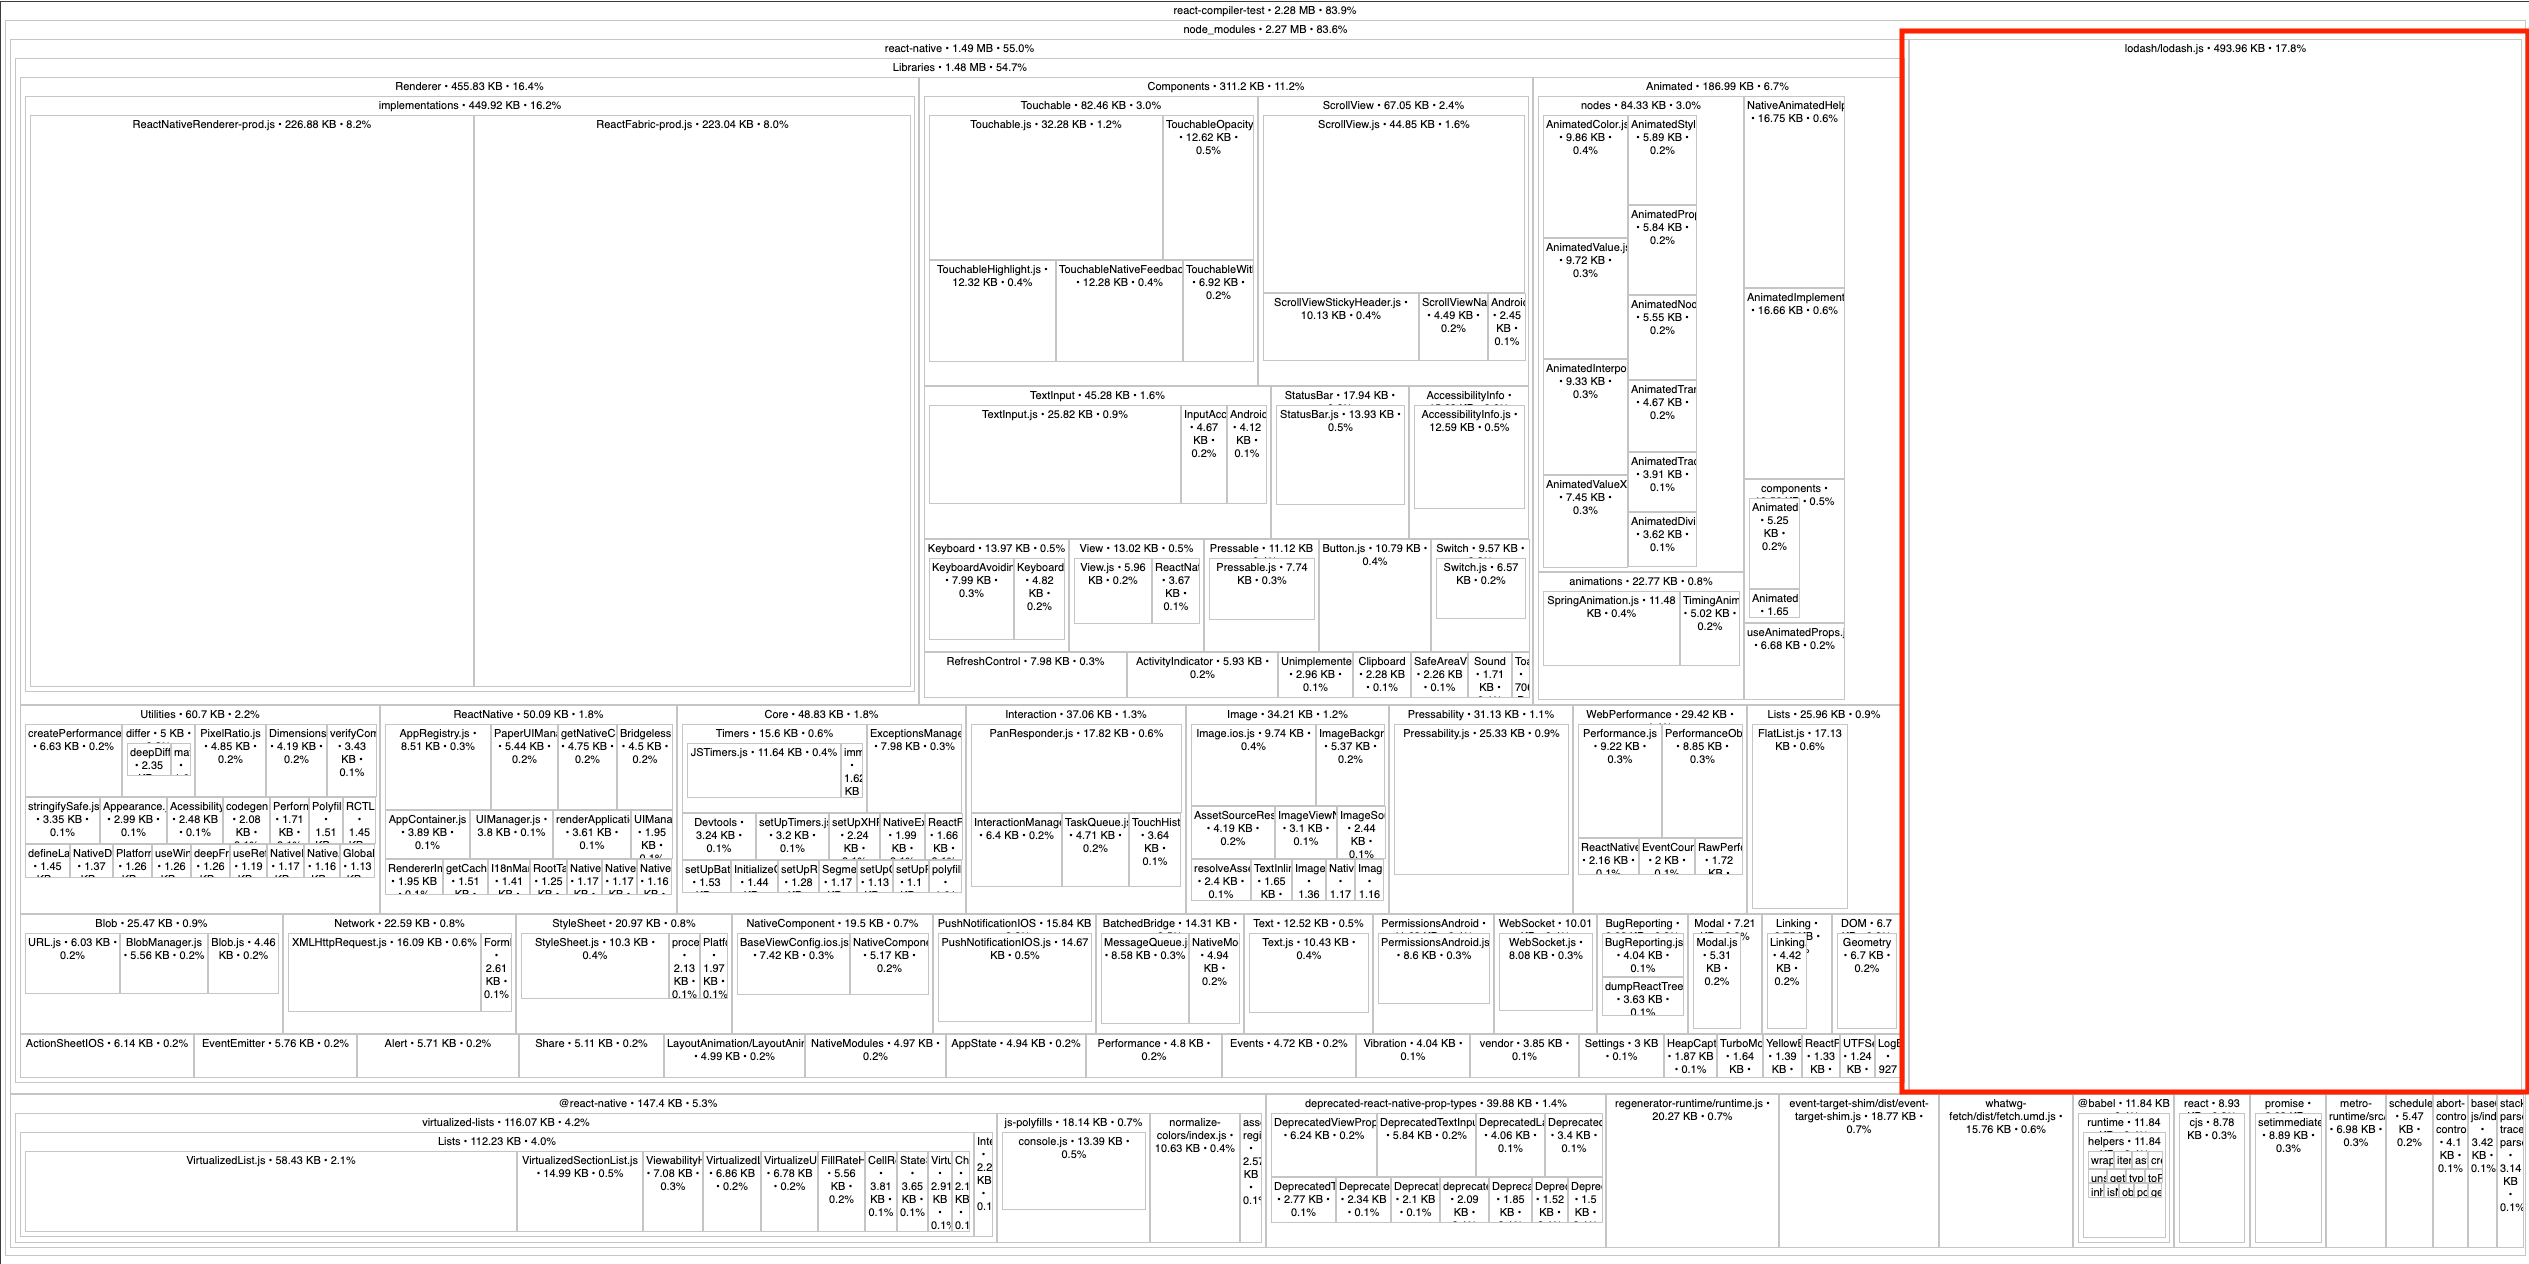
From the previous image, we can see that lodash is 493.96 KB (17.8%). After switching this import statement to import debounce from 'lodash/debounce';, the bundle size reduces dramatically.
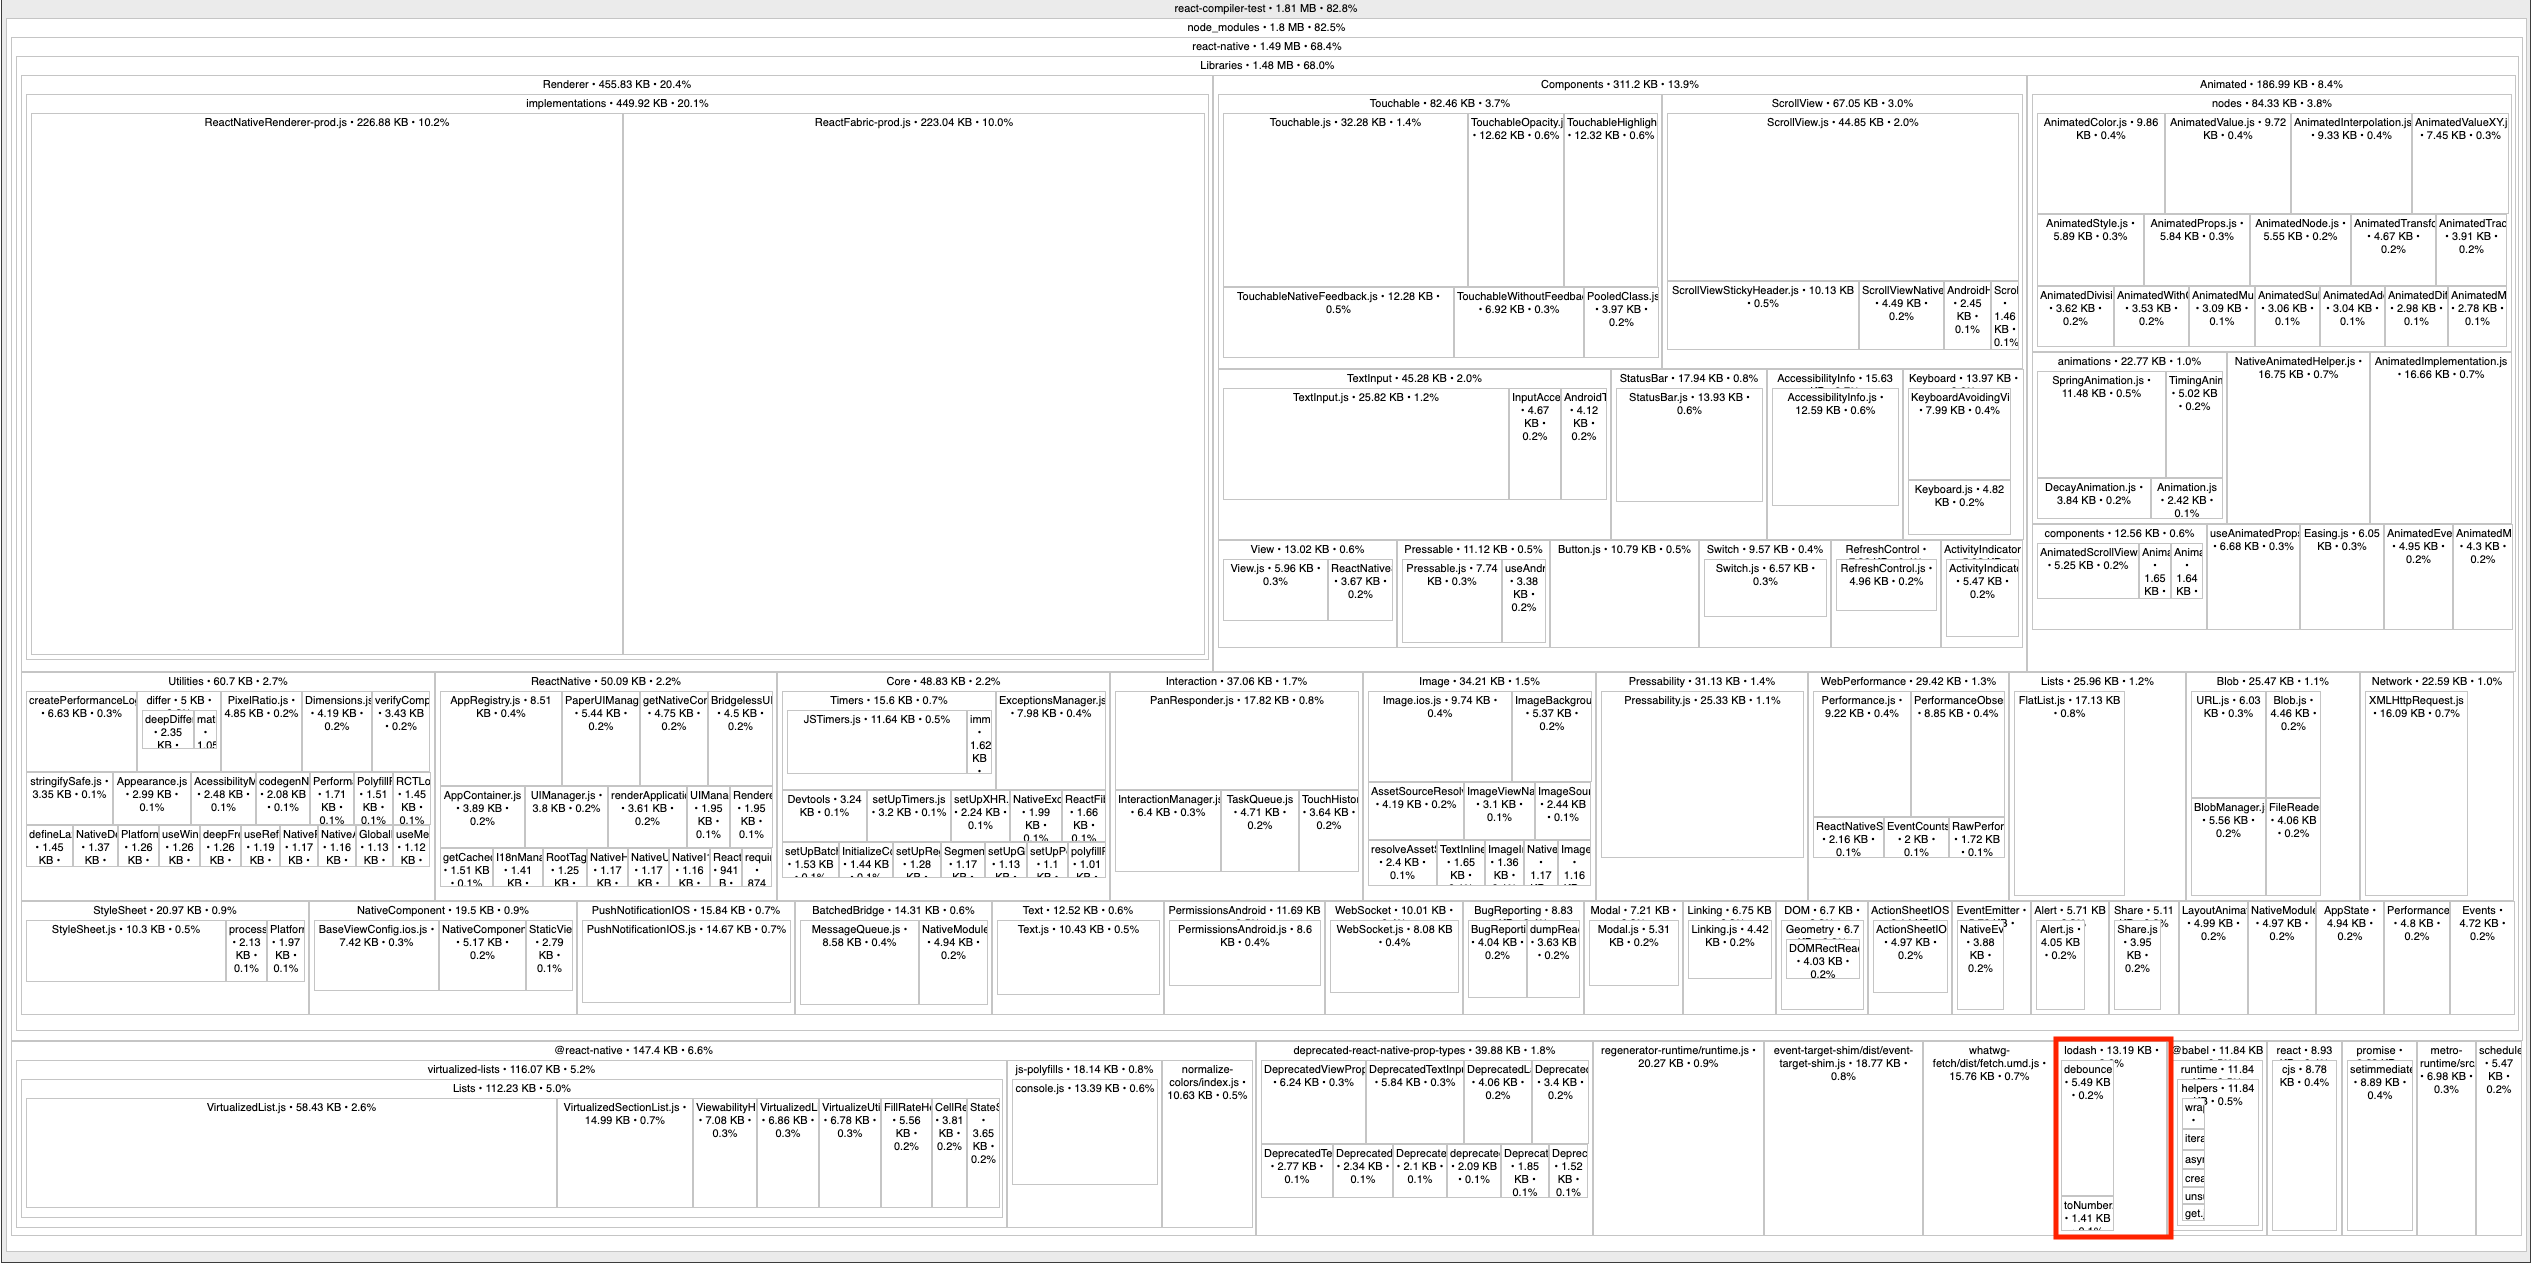
Now, lodash is only 13.19 KB (0.6%). Changing this import statement reduced the app's bundle size by 480.77 KB.
Improving initial app launch times
Utilize Vega's Native SplashScreen API to display your splash screen efficiently. This API renders a splash screen natively from raw image assets bundled in your vpkg, for immediate visibility when your app launches. This approach frees up your app's JavaScript thread to handle critical tasks like content loading and network calls, instead of rendering a JavaScript-based splash screen. The native splash screen automatically dismisses after your app's first frame renders. you can use two methods to customize when to dismiss a splash screen. Call usePreventHideSplashScreen(), which overrides the splash screen auto-dismissal, and also call useHideSplashScreenCallback(), which hides the splash screen.
Related topics
- Measure App KPIs
- Discover Performance Issues Using Vega ESLint Plugin
- If you are developing a WebView app, see Vega Web App Performance Best Practices
- Set Up Amazon Devices Builder Tools for AI-Powered Development
Last updated: Jun 19, 2026