
Step 1:Create Your Video Skill and Lambda Function (VSK Echo Show)
In this step, you will set up a video skill through the Alexa developer console and also create a basic Lambda function on AWS to process communication from the video skill.
Note that this step is almost identical to Step 1: Create Your Video Skill and Lambda Function in the Fire TV Apps documentation.The main difference is that the basic Lambda code is different, and multimodal devices require some additional configuration in the video skill.Note that you cannot use the same video skill for both Fire TV apps and multimodal devices because the Lambda function that the video skill interacts with is different.(The interaction model for app and app-less devices requires different processes on the backend.)
- Video Skill and Lambda Overview
- Step 1.1: Begin Creating a Video Skill
- Step 1.2: Create an IAM Role for your Lambda
- Step 1.3: Create the Lambda Function for Your Video Skill
- Step 1.4: Finish Setting Up Your Video Skill
- Next Steps
Video Skill and Lambda Overview
On multimodal devices, Alexa listens for utterances from users and then converts the utterances into directives.A directive is a set of data and instructions, expressed in JSON, sent from Alexa to your Lambda function in the cloud.
For example, when a user says "Play Bosch," Alexa converts this into a directive that has a specific JSON structure.Directives have header names and unique properties and structure.With multimodal devices, the directives can include search, browse, play, and more (similar to Fire TV).
However, in contrast to Fire TV, the header names in the directives differ.With multimodal devices, the directive header names include GetPlayableItems, GetPlayableItemsMetadata, GetBrowseNodeItems, GetDisplayableItems, GetDisplayableItemsMetadata, and GetNextPage.
Alexa does the work of mapping the user's utterances into the formal directives that can be processed programmatically.In other words, Alexa figures out what the user is saying and packages their request into a formal information schema that aligns with a specific JSON structure so that it can be processed programmatically by your code.
The Video Skill API then delivers these directives to your Lambda code on AWS.Lambda is an AWS service that runs code in the cloud without requiring you to have a server to host the code.Your Lambda code can process the directives from the video skill, often communicating with a backend service to do lookups, search, and perform other needed functions.
After your Lambda retrieves the needed information, your Lambda then sends responses back to Alexa.The responses you send must also align with a specific structure so that Alexa can process them.Note this difference from the Fire TV app integration — rather than using ADM to push a notification to your app, the multimodal workflow has your Lambda return responses directly to Alexa (through the callback in your Lambda function).
Step 1.1: Begin Creating a Video Skill
In this step, you'll begin creating a video skill so that you can get the skill's Application ID.This Application ID will be used when you create your Lambda function.
To begin creating your video skill:
- Go to https://developer.amazon.com.
- In the upper-right corner, click Developer Console.If you're not signed in, you'll be prompted to sign in.
- In the top navigation, click Alexa and select Alexa Skills Kit.
- Click Create Skill.
-
Under the Skill name field, type a simple name for your skill (usually the name of your app, such as
Streamz Media).Tip: The name should be easy and obvious for a user to say via voice.If you're creating a test skill, use a skill name that doesn't sound like a movie title, as this makes parsing the natural language more difficult.Additionally, your skill's name must not indicate that its functionality is limited.For example, you should not use "basic," "reduced," or "simple" in the name of your skill. -
Under "Choose a model to add to your skill," select the Video square.

Creating a video skill in the Alexa Developer Console Warning: If you don't see a Video option when creating a skill, do not create a custom skill instead.Video skills are available only to developers creating apps in countries and locales that support video skills.If video skills aren't supported in your target country, you can't create a video skill for your app yet. - Click Create skill in the upper-right corner.
-
Click Copy to clipboard next to Your Skill ID (highlighted in the following screenshot).

Video Skill ID Store this information in a simple text file on your computer, as you'll be gathering other information here as you proceed through this tutorial.You will need this Skill ID value when you create the Lambda function for your video skill.
Notice that the Video Skill Configuration requires you to configure a default endpoint, specifically an ARN (Amazon Resource Name) for a Lambda function.

ARN required to configure video skill Before you continue configuring your video skill, you need to pause here to get a Lambda ARN.To do so, you will need to create an IAM role and Lambda function.You can open a new tab to avoid losing your place in the video skill (though your session might time out).
Step 1.2: Create an IAM Role for your Lambda
This task is preparatory to creating your Lambda function (which your video skill will interact with).You need to define permissions that specify which applications can invoke your Lambda function.Here you'll create an IAM role that allows Lambda functions to call AWS services, such as Cloudwatch, on your behalf.To create the IAM role:
- Sign in to the AWS Managment Console.
-
In the upper-right, select the appropriate AWS region based on the table provided in AWS Regions and Video Skills.(Unlike with IAM, Lambda functions are specific to AWS regions.)

Selecting an AWS region Selecting a region close to your customers will ensure that the latency between customer utterances and Lambda invocations is minimal.Also, the video skill won't work if you select the wrong AWS region.
Note: Alexa support for video skills in some of these locales is still forthcoming.See Supported Countries. - Click Services in the upper-left corner and go to IAM (use the Search box).
- Select Roles from left navigation, and then click Create role.
- Under AWS service (selected by default), click Lambda, and then click Next: Permissions at the bottom.
- Search for AWSLambdaBasicExecutionRole and select the check box next to it; then click Next: Tags.
- Skip the "Add tags (optional)" configuration and click Next: Review.
-
Give your role a name (for example, "video_skill_streamz") and description as you like, and click Create role.

Creating an IAM role that can interact with your Lambda Make a note of your IAM role name (especially if you have multiple IAM roles in AWS) so that you can easily remember it for the next step.
Step 1.3: Create the Lambda Function for Your Video Skill
Now you'll create the Lambda function that your video skill will use.Creating the function will give you an Amazon Resource Name (ARN), which is required to configure your video skill.To create the Lambda function for your video skill:
- In the AWS Management Console, click Services and go to Lambda (use the Search box).
- Click Create function.
- Leave Author from scratch selected as is, and then complete the following:
- Function name: A unique name for your Lambda function (for example,
multimodal_lambda). - Runtime: Node.js 8.10 (Node JS is what the sample Lambda code is written in for this integration.Later, you can explore using other languages for your Lambda, such as Python, Ruby, .NET, Java, etc.).
- Permissions
- Execution role: Use an existing role.
- Existing role: Select the IAM role that you created in the previous section (Step 1.2: Create an IAM Role for your Lambda).

Creating a basic Lambda function in AWS Tip: Make a note of your Lambda name, as you will need to reference this name in upcoming steps.
- Function name: A unique name for your Lambda function (for example,
-
Click Create function.
Your Lambda function is created.Note that your Lambda function will not receive directives from Alexa unless your add a Smart Home trigger that tells the Lambda where it should get the message from.This is what the Smart Home API does — connect your devices to Lambda computing in the cloud.However, in order to configure the Alexa Smart Home trigger, you need the Application ID for your video skill.
When your customer wants to control a smart device, Alexa sends the voice command to the skill via the cloud.The skill then sends back instructions to your device as per the customer’s intention.
- In the Designer section, click + Add trigger.
-
In the Trigger configuration, select Alexa Smart Home and then enter your video skill ID (created in section 1.1) in the Application ID field.Then click Add.

Configuring Lambda with your Video Skill ID After you click Add, you receive a success notification that says, "The trigger [123456…] was successfully added to function [Lambda function name].The function is now receiving events from the trigger."
In this case, the trigger is your video skill.Your Lambda function will now receive events from your video skill.
Note: If you're using "versioning" for your Lambda function, you will need to re-add the Smart Home Trigger each time that a new version is created. -
The ARN for your Lambda function appears in the upper-right corner of the page, as shown in the following screenshot.Copy your Lambda's ARN and make a note of it, as you will need it in the next section (Step 1.4: Finish Setting Up Your Video Skill) to configure your video skill.

Location of the ARN for your Lambda function - Click your Lambda function's name (the box with
 ) in the center of the page.This expands a code editor in the following pane.
 - To facilitate the initial setup, we’ve included some basic Lambda code.This code provides a starting point for implementing a video skill.The code will respond to the directives from Alexa and communicate back to Alexa.
Note: Because this sample Lambda isn't communicating with a real backend service to do lookups and queries for information, the responses back to Alexa are all hard-coded as predefined responses.Even so, these predefined, hard-coded responses show you the expected responses for the incoming Alexa directives.
Do the following:
- Click the following Copy button to copy the code to your clipboard.
- Paste all of the code from that file into the function code editor exactly as is, replacing the existing code in the editor's
index.jsfile. - Click Save in the upper-right corner.
/**
* Copyright 2017 Amazon.com, Inc. or its affiliates.All Rights Reserved.
*
* Licensed under the Amazon Software License (the "License").You may not use
* this file except in compliance with the License.A copy of the License is
* located at http://aws.amazon.com/asl/ or in the "license" file accompanying
* this file.This file is distributed on an "AS IS" BASIS, WITHOUT WARRANTIES
* OR CONDITIONS OF ANY KIND, express or implied.See the License for the
* specific language governing permissions and limitations under the License.
**/
// This is a sample lambda for use with video skills on multimodal devices.
// This is sample code only, and does not come with any guarantees.
var AWS = require('aws-sdk');
exports.handler = (event, context, callback) => {
console.log("Interaction starts");
hardCodedResponse(event, context);
};
function hardCodedResponse(event, context) {
var name = event.directive.header.name;
console.log("Alexa Request: ", name, JSON.stringify(event));
var DiscoverResultResponse = {
"event": {
"header": {
"namespace": "Alexa.Discovery",
"name": "Discover.Response",
"payloadVersion": "3",
"messageId": "ff746d98-ab02-4c9e-9d0d-b44711658414"
},
"payload": {
"endpoints": [{
"endpointId": "ALEXA_VOICE_SERVICE_EXTERNAL_MEDIA_PLAYER_VIDEO_PROVIDER",
"endpointTypeId": "TEST_VSK_MM",
"manufacturerName": "TEST_VSK_MM",
"friendlyName": "TEST_VSK_MM",
"description": "TEST_VSK_MM",
"displayCategories": ["APPLICATION"],
"cookie": {},
"capabilities": [{
"type": "AlexaInterface",
"interface": "Alexa.RemoteVideoPlayer",
"version": "1.0"
}, {
"type": "AlexaInterface",
"interface": "Alexa.PlaybackController",
"version": "1.0"
}, {
"type": "AlexaInterface",
"interface": "Alexa.SeekController",
"version": "1.0"
}, {
"type": "AlexaInterface",
"interface": "Alexa.ChannelController",
"version": "1.0"
},
{
"type": "AlexaInterface",
"interface": "Alexa.MultiModalLandingPage",
"version": "1.0"
}
]
}]
}
}
};
var GetPlayableItemsResponse = {
"event": {
"header": {
"correlationToken": "dFMb0z+PgpgdDmluhJ1LddFvSqZ/jCc8ptlAKulUj90jSqg==",
"messageId": "5f0a0546-caad-416f-a617-80cf083a05cd",
"name": "GetPlayableItemsResponse",
"namespace": "Alexa.VideoContentProvider",
"payloadVersion": "3"
},
"payload": {
"nextToken": "fvkjbr20dvjbkwOpqStr",
"mediaItems": [{
"mediaIdentifier": {
"id": "tt1254207"
}
}]
}
}
};
var GetPlayableItemsMetadataResponse = {
"event": {
"header": {
"correlationToken": "dFMb0z+PgpgdDmluhJ1LddFvSqZ/jCc8ptlAKulUj90jSqg==",
"messageId": "38ce5b22-eeff-40b8-a84f-979446f9b27e",
"name": "GetPlayableItemsMetadataResponse",
"namespace": "Alexa.VideoContentProvider",
"payloadVersion": "3"
},
"payload": {
"searchResults": [{
"name": "Big Buck Bunny",
"contentType": "ON_DEMAND",
"series": {
"seasonNumber": "1",
"episodeNumber": "1",
"seriesName": "Blender Foundation Videos",
"episodeName": "Pilot"
},
"playbackContextToken": "{\"streamUrl\": \"http:\/\/commondatastorage.googleapis.com\/gtv-videos-bucket\/sample\/BigBuckBunny.mp4\", \"title\": \"Big Buck Bunny\"}",
"parentalControl": {
"pinControl": "REQUIRED"
},
"absoluteViewingPositionMilliseconds": 1232340
}]
}
}
};
var GetDisplayableItemsResponse = {
"event": {
"header": {
"correlationToken": "dFMb0z+PgpgdDmluhJ1LddFvSqZ/jCc8ptlAKulUj90jSqg==",
"messageId": "5f0a0546-caad-416f-a617-80cf083a05cd",
"name": "GetDisplayableItemsResponse",
"namespace": "Alexa.VideoContentProvider",
"payloadVersion": "3"
},
"payload": {
"nextToken": "fvkjbr20dvjbkwOpqStr",
"mediaItems": [{
"mediaIdentifier": {
"id": "tt1254207"
}
},
{
"mediaIdentifier": {
"id": "tt0807840"
}
},
{
"mediaIdentifier": {
"id": "tt7993892"
}
},
{
"mediaIdentifier": {
"id": "tt4957236"
}
},
{
"mediaIdentifier": {
"id": "tt2285752"
}
}
]
}
}
};
var GetNextPageResponse = {
"event": {
"header": {
"correlationToken": "dFMb0z+PgpgdDmluhJ1LddFvSqZ/jCc8ptlAKulUj90jSqg==",
"messageId": "9f4803ec-4c94-4fdf-89c2-d502d5e52bb4",
"name": "GetNextPageResponse",
"namespace": "Alexa.VideoContentProvider",
"payloadVersion": "3"
},
"endpoint": {
"scope": {
"type": "BearerToken",
"token": "Alexa-access-token"
},
"endpointId": "appliance-001"
},
"payload": {
"nextToken": "qefjrfiugef74",
"mediaItems": [{
"mediaIdentifier": {
"id": "tt0807840"
}
},
{
"mediaIdentifier": {
"id": "tt1254207"
}
},
{
"mediaIdentifier": {
"id": "tt7993892"
}
},
{
"mediaIdentifier": {
"id": "tt2285752"
}
},
{
"mediaIdentifier": {
"id": "tt4957236"
}
}
]
}
}
}
var GetDisplayableItemsMetadataResponse = {
"event": {
"header": {
"correlationToken": "dFMb0z+PgpgdDmluhJ1LddFvSqZ/jCc8ptlAKulUj90jSqg==",
"messageId": "38ce5b22-eeff-40b8-a84f-979446f9b27e",
"name": "GetDisplayableItemsMetadataResponse",
"namespace": "Alexa.VideoContentProvider",
"payloadVersion": "3"
},
"payload": {
"resultsTitle": "SearchResults",
"searchResults": [{
"name": "Big Buck Bunny",
"contentType": "ON_DEMAND",
"itemType": "VIDEO",
"releaseYear": "2014",
"selectionAction": "PLAY",
"thumbnailImage": {
"contentDescription": "Big Buck Bunny image",
"sources": [{
"url": "https:\/\/devportal-reference-docs.s3-us-west-1.amazonaws.com\/video-skills-kit\/bigbuckbunnythumb.png",
"size": "X_LARGE",
"widthPixels": 1920,
"heightPixels": 1280
}]
},
"runtime": {
"runTimeInMilliseconds": 540000,
"displayString": "9m"
},
"closedCaption": {
"status": "AVAILABLE",
"displayString": "CC"
},
"absoluteViewingPositionMilliseconds": 0,
"parentalControl": {
"pinControl": "REQUIRED"
},
"viewingDisplayString": "PurchaseOptions",
"reviews": [{
"totalReviewCount": 1897,
"type": "FIVE_STAR",
"ratingDisplayString": "4.06"
}],
"rating": {
"category": "G"
},
"mediaIdentifier": {
"id": "tt1254207"
}
},
{
"name": "Cosmos Laundromat",
"contentType": "ON_DEMAND",
"itemType": "VIDEO",
"releaseYear": "2014",
"selectionAction": "PLAY",
"thumbnailImage": {
"contentDescription": "On a desolate island, suicidal sheep Franck meets his fate in a quirky salesman, who offers him the gift of a lifetime.Little does he know that he can only handle so much lifetime...",
"sources": [{
"url": "https:\/\/devportal-reference-docs.s3-us-west-1.amazonaws.com\/video-skills-kit\/cosmos_laundromat_thumb.png",
"size": "X_LARGE",
"widthPixels": 1920,
"heightPixels": 1280
}]
},
"runtime": {
"runTimeInMilliseconds": 720000,
"displayString": "2m30s"
},
"closedCaption": {
"status": "AVAILABLE",
"displayString": "CC"
},
"absoluteViewingPositionMilliseconds": 0,
"parentalControl": {
"pinControl": "REQUIRED"
},
"viewingDisplayString": "PurchaseOptions",
"reviews": [{
"totalReviewCount": 600,
"type": "FIVE_STAR",
"ratingDisplayString": "7.4"
}],
"rating": {
"category": "G"
},
"mediaIdentifier": {
"id": "tt7993892"
}
},
{
"name": "Tears of Steel",
"contentType": "ON_DEMAND",
"itemType": "VIDEO",
"releaseYear": "2015",
"selectionAction": "PLAY",
"thumbnailImage": {
"contentDescription": "Watch the full Tears of Steel movie",
"sources": [{
"url": "https:\/\/devportal-reference-docs.s3-us-west-1.amazonaws.com\/video-skills-kit\/tears_of_steel_thumb.png",
"size": "X_LARGE",
"widthPixels": 1920,
"heightPixels": 1280
}]
},
"runtime": {
"runTimeInMilliseconds": 720000,
"displayString": "2m30s"
},
"closedCaption": {
"status": "AVAILABLE",
"displayString": "CC"
},
"absoluteViewingPositionMilliseconds": 0,
"parentalControl": {
"pinControl": "REQUIRED"
},
"viewingDisplayString": "PurchaseOptions",
"reviews": [{
"totalReviewCount": 987,
"type": "FIVE_STAR",
"ratingDisplayString": "7.1"
}],
"rating": {
"category": "G"
},
"mediaIdentifier": {
"id": "tt2285752"
}
}
]
}
}
};
if (name === 'Discover') {
console.log("Lambda Response: DiscoverResultResponse", JSON.stringify(DiscoverResultResponse));
context.succeed(DiscoverResultResponse);
} else if (name === 'GetPlayableItems') {
console.log("Lambda Response: GetPlayableItemsResponse", JSON.stringify(GetPlayableItemsResponse));
context.succeed(GetPlayableItemsResponse);
} else if (name === 'GetPlayableItemsMetadata') {
console.log("Lambda Response: GetPlayableItemsMetadataResponse", JSON.stringify(GetPlayableItemsMetadataResponse));
context.succeed(GetPlayableItemsMetadataResponse);
} else if (name === 'GetDisplayableItems') {
console.log("Lambda Response: GetDisplayableItemsResponse", JSON.stringify(GetDisplayableItemsResponse));
context.succeed(GetDisplayableItemsResponse);
} else if (name === 'GetDisplayableItemsMetadata') {
console.log("Lambda Response: GetDisplayableItemsMetadataResponse", JSON.stringify(GetDisplayableItemsMetadataResponse));
context.succeed(GetDisplayableItemsMetadataResponse);
} else if (name === 'GetNextPage') {
console.log("Lambda Response: GetNextPageResponse", JSON.stringify(GetNextPageResponse));
context.succeed(GetNextPageResponse);
}
};
The following screenshot shows the code editor where you insert the code.

More explanation and instruction regarding the Lambda code and logic will be given later (specifically, in Step 3: Understand the Alexa Directives and Expected Responses).But briefly, Alexa listens for customer utterances (e.g., "Play Interstellar") and packages up the request as a directive (a JSON object).The Lambda function will receive requests sent from Alexa and take some action.
In this code, the Lambda logs the event and context to the console.The event is the Alexa directive that hits your Lambda; the context includes the details surrounding the event.This sample Lambda then returns predefined, hard-coded responses that demonstrate the expected responses.
Later in the process (Step 6: Respond to Alexa Directives Delivered to Lambda), you will configure your Lambda to perform the needed lookups and other actions with your backend service as required by the incoming directive.With the gathered information, your Lambda would then provide the response (following a specific JSON schema) back to Alexa via a callback.
When you customize the Lambda code in more detail, you will need to handle every type of request a user would make to your skill and provide the correct response back to the Video Skill API.As you do this more advanced customization, you will need to test your video skill for the way it handles various directives.All video skills undergo detailed certification.For now, you're finished setting up the basic Lambda code.
Step 1.4: Finish Setting Up Your Video Skill
Return to the video skill you started setting up in Step 1.1: Begin Creating a Video Skill and complete the video skill setup.
To finish setting up your video skill:
- Return to your video skill in the Alexa developer console.
- In the list of Alexa Skills, click the video skill you started earlier.(If you left this screen open, make sure you're still signed in by refreshing the page.)
- Paste the Lambda's ARN into the Default endpoint box.(You copied this ARN in Step 1.3: Create the Lambda Function for Your Video Skill.)
-
In the "Pick a geographical region … " section, you can select different Lambda ARNs based on different regions to the reduce the latency between Alexa and your Lambda.Based the your AWS region you selected earlier, paste your ARN into one of these regions.

Configuring your video skill with your Lambda ARN -
In the Country Specific Configuration selection, select a country for your skill.By default, a country should already be selected (e.g., United States).If your video skill will be available in more than one country, click Add Country and add the additional countries.
Below the country you will see a sub-section titled "A. [Country name] Configuration." This lists the Catalog details for the country.If you added more countries, you see additional Catalog details for each country.For example, if you added both United States and Canada for your video skill, you see two Catalog subsections as follows:
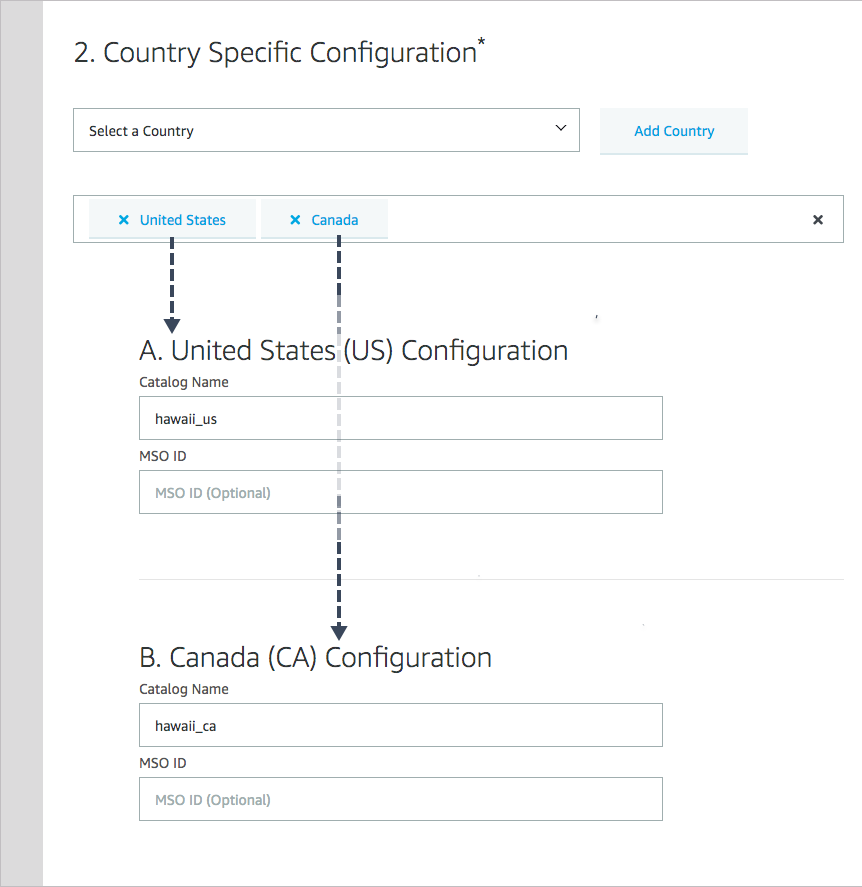
Catalog subsections corresponding to countries Note: Even though many countries might be listed here, only the countries listed in Supported Countries can support video skills.(Other countries might be listed for beta development purposes.) -
In the Catalog Name field, enter the name of your catalog (for each country).
As noted in the introduction, Catalog integration is required for video skills.When users request a media title, Amazon will look within your catalog for title matches and send you the corresponding identifiers.For more details about catalog integration, including the CDF format, see the Catalog documentation.
Sample catalog for testing a multimodal device workflow
For the simple setup of seeing a test video skill in action on a multimodal device, you can use the following catalog names:hawaii_us(for US skills).Orhawaii_ca(Canada),hawaii_de(Germany),hawaii_es(Spain),hawaii_gb(Great Britain),hawaii_in(India),hawaii_it(Italy),hawaii_jp(Japan).This catalog, used for testing, just contains a few Creative Commons videos (e.g., Big Buck Bunny, Elephants Dream, Cosmos Laundromat, Caminandes: Llamigos, and Tears of Steel (as noted in this feed). - Ignore the MSO ID, as this field is not used for video skills on multimodal devices.(MSO stands for multiple-system operator and is used for live TV integration of video skills into set-top boxes.)
-
In the Language Specific Configuration section, select the language for your video skill.Languages corresponding to the countries you selected earlier will automatically be added, but you can add additional languages as desired by clicking Add Language.Each additional language you enter will create a corresponding subsection with Skill Invocation details.
For example, suppose your video skill is available in both United States and Canada.As a result, two languages are selected by default: en-US and en-CA.As a result, you see two subsections to configure the skill invocation for each of these languages: "A. English (United States): en-US Configuration" and "B. English (Canada): en-CA Configuration," as shown in the following screenshot:
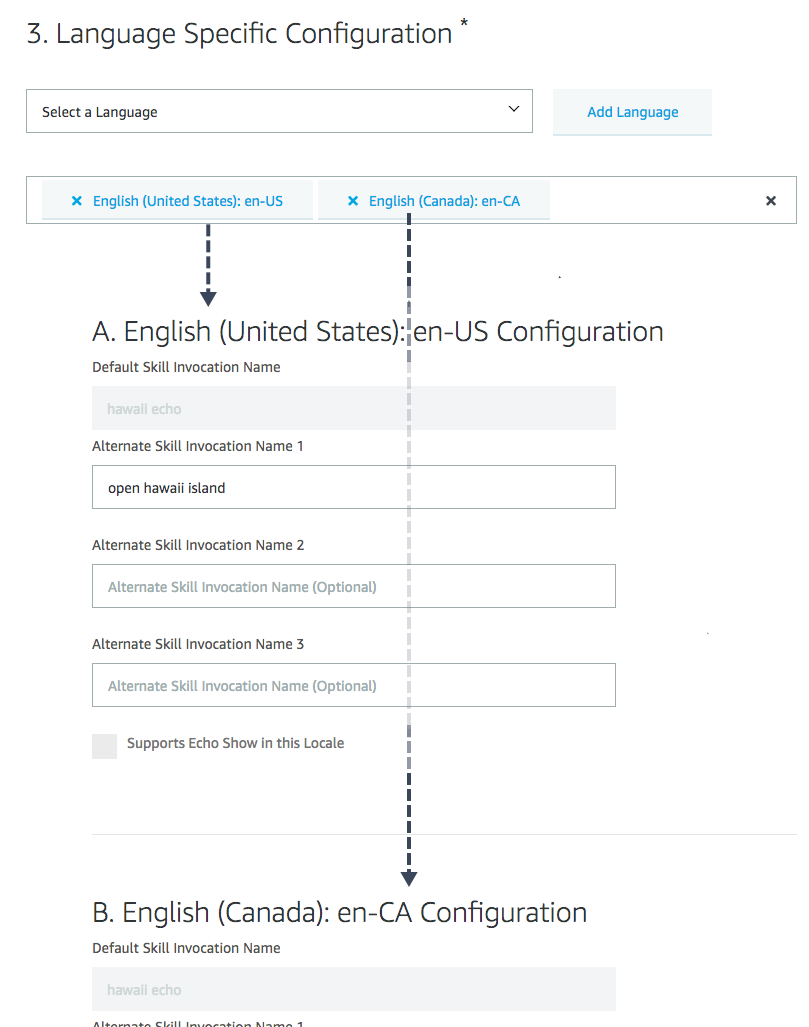
Language-specific configuration by country These subsections allow you to customize the video skill invocation names and image assets for each language.For example, suppose your video skill name differs between the two locations, or has a different logo image, you could customize the invocation and display appropriately through these subsections.
-
In the Alternate Skill Invocation boxes, enter additional ways to invoke your skill.By default, your video skill can be invoked by the name you gave it when you created the skill (in section Step 1.1: Begin Creating a Video Skill).But you can create alternate names here as well.
For example, suppose your skill was named XYZ.Users could say, "Play the movie Big Buck Bunny on XYZ" to invoke your video skill.(This utterance explicitly targets your skill.) If you added an alternate skill invocation of "ACME," then users could say "Play the movie Big Buck Bunny on ACME" and Alexa would target your video skill through this invocation as well.
- Select the Supports Echo Show in this Locale check box.Selecting this box expands additional fields to configure the Web Player URI, Background, and Logo images for your multimodal skill.
-
In the Web Player URI field, enter the location of your web player.More detail about the web player is provided in Step 5: Build Your Web Player.
Sample web player for testing a multimodal device workflow
If you're setting up a quick skill to preview/test how video skills work, you can use the following web player URI:https://amzndevresources.com/video-skills-kit/sample-web-player/sample_web_player/index.html.This URI simply provides the default web player code in an S3 bucket that is configured as a static website. -
In the Background image and Logo image fields, drag in two images for your skill.The required image assets are as follows:
Background Image
- Aspect ratio: 16/9
- Minimum size: 512px wide x 288px high
- Maximum size: 1280px wide x 720px high
- File type: PNG
The Background image appears on Video Home screen (say "Alexa, go to Video Home" to view this screen).Video Home shows the various video skills represented by Background images.In the following screenshot, "Video Skill Logo" represents one of these Background images.

Example of Background image Logo Image
- Aspect ratio: 1/1 for minimum size, 16:9 for maximum size
- Minimum size: 48px wide x 48px high
- Maximum size: 1280px wide x 720px high
- File type: PNG
- Transparent background: Recommended
The Logo image appears in the upper-right corner on search and browse templates (say "Alexa, Open Prime Video" to open the category template).Consider using a transparent background in your Logo image.In the following screenshot, the Logo image says "Prime Video."

Example of Logo image Sample image assets for testing a multimodal device workflow
If you're creating a quick test skill to preview how video skills work on multimodal devices, you can use these two sample files for your image assets: Logo image, Background image.Right-click the files and choose Save Link As.Tip: A design guide with more details about file types, transparency, safe zones, placement, and other information is forthcoming. - Aspect ratio: 16/9
- After configuring the invocation names and image assets for your video skills, scroll back up to the top and click Save.
- Click Account Linking in the left navigation.
-
Configure the fields as described in the following table.
Entering sample OAuth values for video skills
As you are creating a video skill, you can enter some test OAuth values here for now.Later in the tutorial, you will go back and add the correct OAuth configuration needed for account linking.Reach out to your Amazon contact for some test OAuth values you can enter.Account Linking Fields Field Description Authorization URI If you haven't set up OAuth yet, reach out to your Amazon contact for a test value you can enter here. Access Token URI If you haven't set up OAuth yet, reach out to your Amazon contact for a test value you can enter here. Client ID Enter alexa-skillClient Secret If you haven't set up OAuth yet, reach out to your Amazon contact for a test value you can enter here. Client Authentication Scheme Leave at the default: HTTP Basic (Recommended) Scope Click +scope and add any simple one-word name (for example, appscope).Domain List Skip this field. Default Access Token Expiration Time Leave blank. Redirect URLs Skip this field. - Click Save.
-
Click the Distribution tab from the top navigation and ensure that all fields are filled in, including all icons.You can modify these fields later if needed (since you don't need to officially publish your skill to test it), but at least put some stub values in each field for now.The following table describes each field.
The following table describes each of the fields:
Distribution Fields Field Description Public Name The name of the skill shown to customers in the Alexa app.Use your skill's name (for example, "ACME Media"). One Sentence Description A quick at-a-glance sentence that describes the skill or what customers can do with it (for example, "This skill allows you to use your voice to interact with ACME Media.").This text appears as the first line in your Alexa skill's description. Detailed Description Describe how to use the skill (for example, "Search for your favorite shows by name, control playback with common commands, change channels, and more."). What's new Release notes for your skill.(For example, "First release of skill.") Example Phrases Sample utterances users can say in your app.Put each utterance on a new line.The sample phrases should correspond with the video skill functionality you implemented.For example: - "Alexa, search for [TV show] on ACME."
- "Alexa, play [movie] on ACME."
- "Alexa, tune to ACME."
- "Alexa, rewind 30 seconds."
- Alexa, show episodes of [TV show] on ACME.
Small Skill Icon A 108 x 108px icon (PNG or JPG) to represent your skill in the Alexa app.The image must accommodate a circular design.If you don't have an image, either use the following stock image or create one using the Alexa Skill Icon Builder.(Right-click the following image and save it to your computer.) 
Large Skill Icon A 512 x 512px icon (PNG or JPG) that provides a larger version of the same icon.This icon appears in the Alexa Skills section of Amazon.com.If you don't have an image, either use the following stock image or create one using the Alexa Skill Icon Builder.(Right-click the following image and save it to your computer.) 
Category Select Video Keywords Simple search words that describe this skill.For example, you might list variations on your app's name and the most popular shows in your app.This helps customers find the skill quickly and easily.Use spaces or commas in between each search term. Privacy Policy URL Link to the privacy policy that applies to this skill.(If you don't have one, link to your website for now.) Terms of Use URL Link to the terms of use document for this skill.(If you don't have one, link to your website for now.) - When you finish with the required fields, click Save and continue.You'll be presented with the next screen in the left navigation: Privacy & Compliance.
-
Complete the Privacy & Compliance fields.Note that you must include some content in Testing Instructions.
Note: For the sake of privacy, you will not receive the actual voice commands that customers say when interacting with your app.Instead, Alexa interprets the utterances and converts them to directives, formatted in JSON.This preserves customer privacy. - When you're finished on this screen, click Save and continue.You'll be presented with the next screen in the left navigation: Availability.
- Complete the Availability fields.Make sure Public is selected and select the appropriate locations (select the same regional availability for your video skill as your app's availability).Then click Save and continue.
-
You're taken to the Certification tab, specifically to to the "Validation" side tab.Assuming you completed all the required fields, you should see "Zero errors found."

Video skill configured and ready for testing There's no need to move through the Functional test and Submission pages.Also, you don't need to submit your video skill at this time.You can test your skill while you are still developing it.
Next Steps
Go on to Step 2: Enable your Video Skill on a Multimodal Device and Test.