App-to-App Account Linking (Starting From the Alexa App)
The app-to-app account linking flow, starting from the Alexa app, enables users to link their Alexa user identity with their identity in another system by starting from the Alexa app. Users can link their account without entering their account credentials in either your app or the Alexa app, when they're logged in to both apps on their mobile device. This account linking flow supports iOS and Android.
The Alexa service implements Proof Key for Code Exchange (PKCE) security measures in the authorization code grant account linking flow. This process verifies that the token request comes from the same client that initiated that authorization request.
Account linking supports the following other implementation options:
- App-to-app starting from your app – Users link their account by starting from your app or website instead of the Alexa app. For details, see App-to-App Account Linking (Starting From Your App). This flow supports authorization code grant type only.
- Alexa app only (browser flow) – Users accomplish account linking entirely within the Alexa app. This flow is the most common. For details, see Choosing an account linking flow. This flow supports both authorization code and implicit grant types.
If you have an app or website and can obtain an authorization grant for your user without requiring them to log in again, Amazon encourages you to implement one of the app-to-app account linking flows in addition to the Alexa app-only flow.
For the rest of this topic, the term app-to-app account linking refers specifically to app-to-app account linking that starts from the Alexa app.
Terminology
This topic uses the following terms:
- Service – The service that you provide. For example, you might have a web-based service, "Ride Hailer", that lets users order taxis.
- App – The app that your users use to interact with your service. Continuing the previous example, you might have a "Ride Hailer" app. This discussion assumes that you are the developer of the app.
- Skill – The Alexa skill that enables the user to interact with your service using Alexa. This topic assumes that you're the developer of the skill.
- Alexa app – The Amazon Alexa app that users can download for their mobile device.
- OAuth 2.0 – An authentication standard by which your service can allow Alexa, with the user's permission, to access information from the account that the user set up with you. For the OAuth 2.0 standard, see OAuth 2.0.
- App Link – A deep link on Android that a user clicks to launch an app. For details about App Links, see the Android documentation.
- Universal Link – A deep link on iOS that a user clicks to launch an app. For details about Universal Links, see the iOS documentation.
- PKCE Authorization – Alexa supports PKCE in the authorization code grant account linking flow for enhanced security. PKCE uses code challenge and code verifier parameters as defined in RFC 7636. You can enable PKCE in the Alexa developer console and ASK CLI. Account linking supports the SHA-256 code challenge method only.
User experience
During app-to-app account linking, the user goes through the following workflow:
- The user starts the process from within the Alexa app by enabling the skill or by clicking on the Link your account option on your skill detail page. If the user starts the account linking process, one of two things happens depending on whether the user has your app installed on their mobile device.
- (App flow) If the user has your app installed on their device, the device launches your app and asks the user to acknowledge the account linking request. After the user acknowledges the request, the device returns the user to the Alexa app.
- (Browser flow for iOS) If the user doesn't have your app installed on their iOS device, the user's browser opens your authorization page specified by
Your Web Authorization URIin the skill settings in the developer console, asking the user to acknowledge the account linking request. After the user acknowledges the request, the authorization website returns the user to the Alexa app. - (Browser flow for Android) If the user doesn't have your app installed on their Android device, the user's browser opens to the page specified by
Your Android App Authorization URI, which asks the user to acknowledge the account linking request. After the user acknowledges the request, the authorization website returns the user to the Alexa app.
After the account is linked and the user is using your skill, the skill uses the same workflow as Alexa-app only (browser flow) account linking. For all options, disabling the skill causes the accounts to unlink.
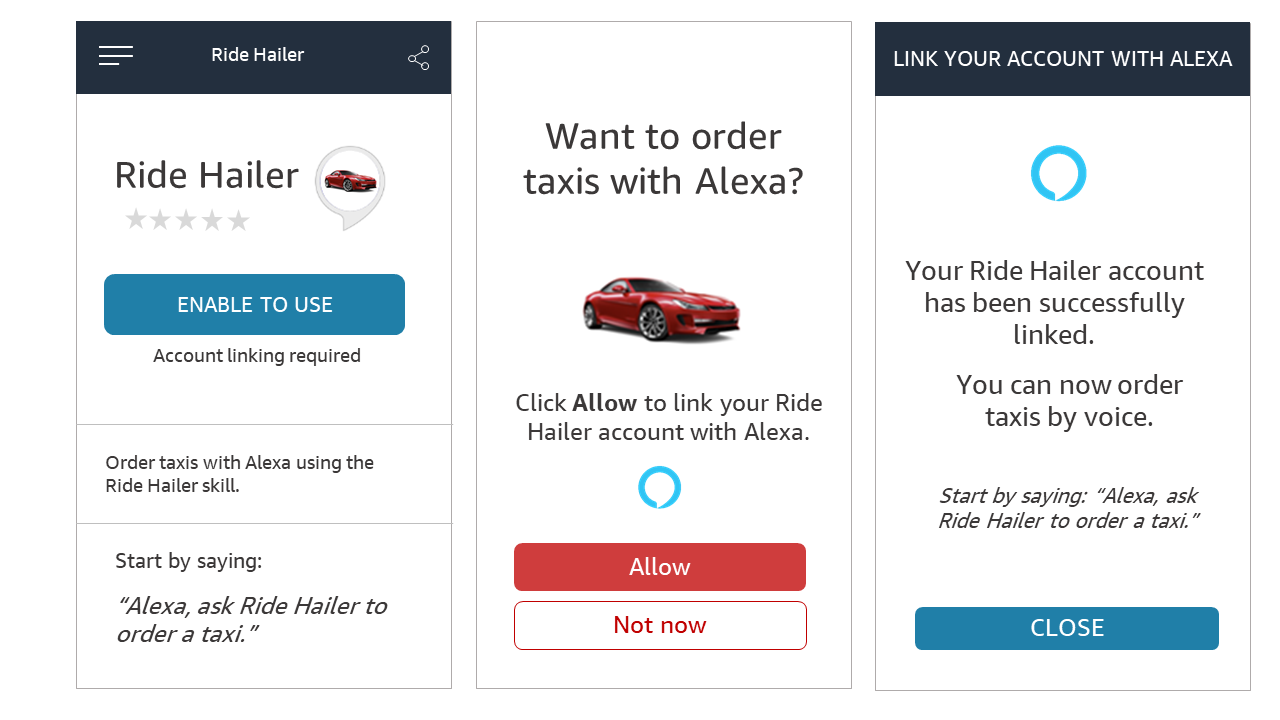
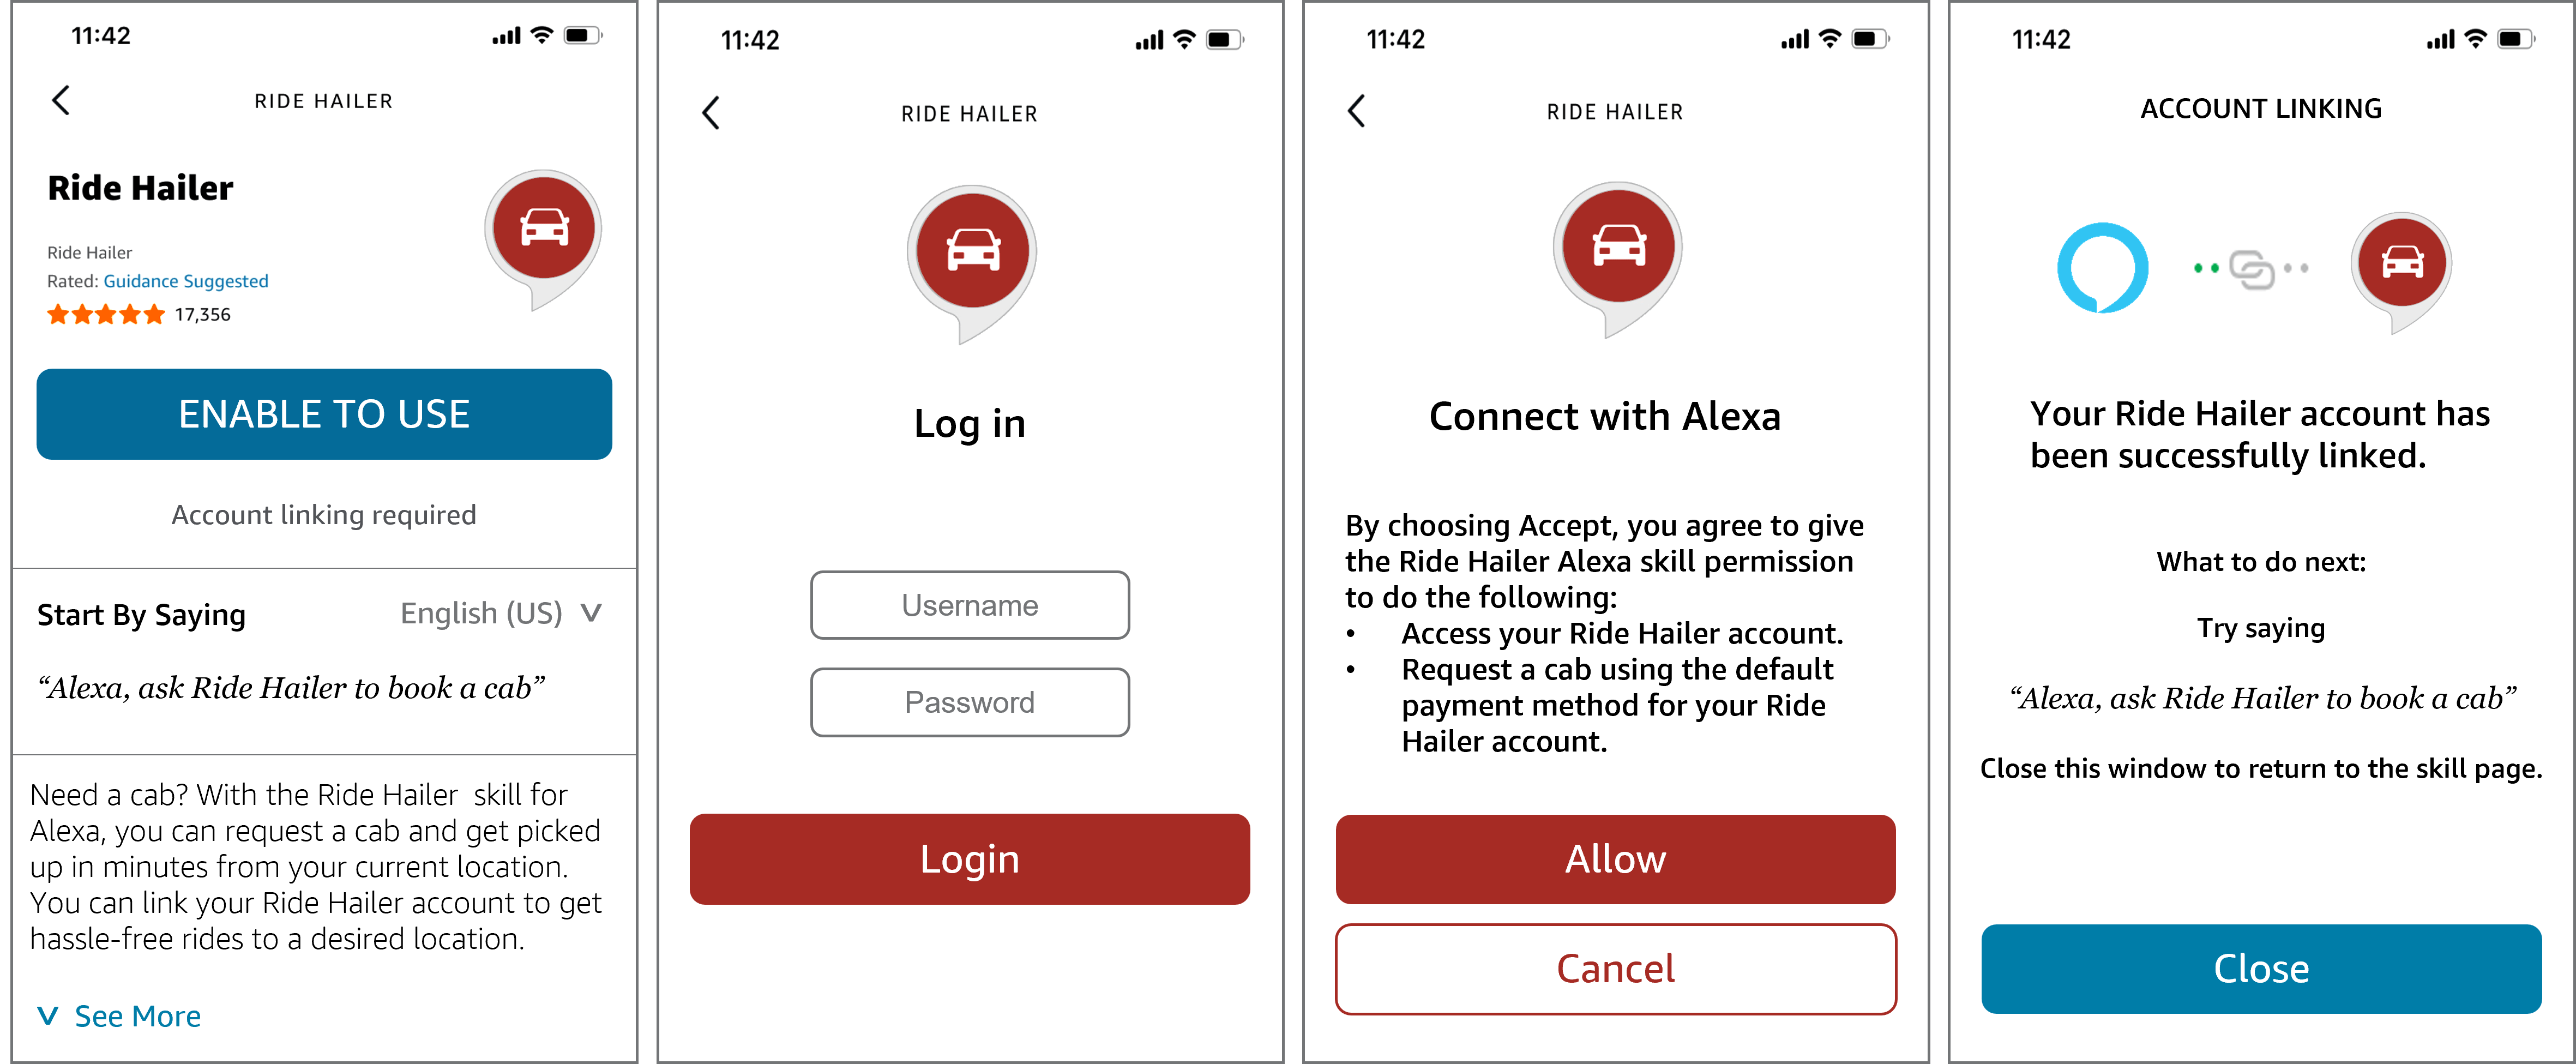
Your app is installed
The following is an example of the flow when your app is installed on the user's mobile device. Your app should ask if the user wants to link their account with Alexa.
Your app isn't installed
The following is an example of the flow when your app isn't installed on the user's mobile device. This flow is the same as the Alexa-app-only flow (browser flow).
Which flow to implement
The app-to-app account linking flow that you implement depends on whether you expect your users to have your app installed on their mobile device. If the user has your app installed on their device, implement the app flow as the primary flow, and the browser flow as the fallback when your app isn't installed. If you don't expect your users to have your app on their mobile device, implement the browser flow.
How it works
App-to-app account linking works by using OAuth 2.0. The steps are as follows:
- The user installs the Alexa app and logs in.
- The user starts the account linking process in the Alexa app by doing one of the following:
- Tapping Enable in your skill's detail page.
- Tapping Link Account in your skill's settings page, if the user previously enabled your skill.
- Tapping Link Account in the account linking card that appeared in the user's Alexa app when they interacted with your skill.
- What happens next depends on whether your app is installed on the user's device.
- If your app is installed:
- The Alexa app sends the user to your app by using your app's Universal Link (iOS) or App Link (Android) with the parameters necessary for an authorization request.
- Your app displays a consent screen that asks the user to accept or deny the request to link their account.
- The user acknowledges the request.
- (Optional) Your app obtains additional information, such as a preferred store location, from the user.
- Your app sends the user back to the Alexa app with the authorization response.
- If your app isn't installed: This is the Alexa-app only account linking experience described in Choosing an account linking flow.
- If your app is installed:
- The Alexa app sends the authorization response from the previous step to the Alexa service, which finishes linking the accounts. The Alexa service uses the following process, depending on whether your skill uses an implicit grant or an authorization code grant.
- Implicit grant (custom skills only): The Alexa service stores the access token that the previous step provided.
- Authorization code grant: The Alexa service calls your token server to exchange the authorization code from the previous step for an access and refresh token pair, and then stores the access and refresh token pair. If your token server supports PKCE and you enabled PKCE in the developer console or CLI, Alexa includes the
code_verifier.
- The account linking process is complete and other workflows, such as device discovery, start on the Alexa app.
Authorization request URL query parameters
The authorization request that the Alexa service makes to your app by using the Universal Link (iOS) or App Link (Android) that you provide includes the following parameters.
| Field | Description |
|---|---|
|
|
An identifier for your skill. You can use this to provide any skill-specific functionality, such as distinguishing between different skills you have configured with account linking. You define the |
|
|
The Alexa app URI that your app redirects the user to with the authorization response. The redirect URI is the same For the authorization code grant type, the redirect URI is one of the following values:
For the implicit grant type, the redirect URI is one of the following values:
For further details, see Alexa Redirect URLs. |
|
|
An optional list of scopes that indicate the access that the Alexa user needs. You define these scopes when you configure account linking for your skill.
|
|
|
The type of response that the request returns after your service authenticates the user. Set to |
|
|
A value that the Alexa service uses to track the user through the account linking process. The Alexa app sends a |
|
|
The hashed value of the PKCE |
|
|
The method to use to transform the Important: Account linking supports the SHA-256 code challenge method only.
|
Steps to implement app-to-app account linking in your app
Complete the following key steps to implement app-to-app account linking in an iOS app (iOS 10.0 or higher) and an Android app (Android 12 or higher). The examples use the Swift 4 (iOS app) and Kotlin (Android app) libraries and languages.
- Enable Universal Links (iOS) or App Links (Android) for your app.
- Configure the skill for account linking.
- Handle the authorization request in your app.
- Redirect the user to the Alexa app.
- Use the access token in the skill.
Step 1: Enable Universal Links (iOS) or App Links (Android) for your app
To enable the Alexa app to request authorization from your app, you must enable Universal Links (iOS) or App Links (Android).
Step 2: Configure the skill for account linking
You configure your skill by using the developer console, the Alexa Skills Kit Command Line Interface (ASK CLI), or the Alexa Skill Management API (SMAPI). During this configuration, you specify aspects like your app's authorization URL (deep-link enabled), access token URL, and so on.
Step 3: Handle the authorization request in your app
When the Alexa service calls your app's Universal Link or App Link using authorizationUrlsByPlatform, your app must show a consent screen to the user and get their authorization to link their account.
Step 4: Redirect the user to the Alexa app
After the user accepts the account linking request in your app, redirect them to the Alexa app to finish the account linking process.
Step 5: Use the access token in the skill
After a user successfully enables your skill and links Alexa with your service, requests sent to your skill include the user's access token. Your skill code needs to get the access token from the request, validate it, and use it to retrieve the necessary user information from your resource server.
Best practices
When you implement app-to-app account linking, keep the following in mind:
- Platform specific fallback mechanism – Configure the web authorization URIs. For Android, Alexa uses the value of the
Your Android App Authorization URIfield as the fallback authorization URI when the user doesn't have your app installed. For iOS, Alexa uses the value of theYour Web Authorization URIfield as the fallback authorization URI when the user doesn't have your app installed. - User interface – When designing your app's user interface, follow the Alexa Brand Guidelines for Amazon Developers.
- Security – If the user's request includes a financial transaction or involves personal information, ask the user to answer a previously defined security question before fulfilling their request.
- Response URI generation – In your code that redirects the user to the Alexa app with an authorization or access token response, Amazon highly recommends that you build the response URI in your backend. This implementation enables you to quickly change parameters or validation logic without having to rebuild your app.
- Enabling app-to-app account linking in your app – Before you publish a live version of your skill, make sure that your app can handle your Universal Link (iOS) or App Link (Android) to open your authorization page.
Testing guidelines
In addition to making sure that your skill meets the certification requirements that apply to all skills, test your implementation of app-to-app account linking. Before doing so, make sure that you've installed both your app and the Alexa app on the mobile device and that you're signed in to both apps. Next, enable the skill through the Alexa app and check the following:
- Upon skill enablement, your app should open to a landing page that provides a confirmation for users to proceed with account linking.
- After selecting the link in the app, make sure the user is taken back to the Alexa app to confirm that linking is complete.
- Interact with the skill to make sure that the skill is properly linked.
If you implemented app-to-app account linking for both iOS and Android, test the full experience separately on both.
For troubleshooting information, see Troubleshooting app-to-app account linking (starting from the Alexa app).
Frequently asked questions
The following are frequently asked questions about app-to-app account linking.
- Q: I have multiple apps that can handle account linking requests. How should I set up the app-to-app account linking flow?
-
In this scenario, your authorization URIs must be able to open different apps. Universal Linking and App Links support this functionality as follows:
-
iOS – You can add the domain of the authorization URI to the entitlements file of every app that you want to be able to handle the account linking request. In the Apple App Association File of the domain, you can then add a different entry for each app. If a user has more than one of the apps installed, the order of their appearance in the Apple App Association File determines the order of preference.
-
Android – You can add the domain of the authorization URI to the app manifest of every app that you want to be able to handle the account linking request. In the Asset Links JSON of the domain, you can add a different entry for each app. If a user has more than one of the apps installed, the Intent Filter Priority of your app's App Manifest determines the order of preference.
-
- Q: Can I use the same app if I have multiple skills?
-
Yes. You can do this in either of the following two ways:
- Use the same authorization URI for every skill that you own.
- Have separate authorization URIs for every skill, and enable Universal Links or App Links for each skill that can open the app.
- Q: What if a user wants to link Alexa with a different user account than the account they're currently using with your app?
-
If you expect your users to link a different account with Alexa than the one they're using, you can enable users to log out and choose a different account when they receive the request to link accounts in your app.
- Q: I use a third-party authorization server. Can I implement app-to-app account linking?
-
Yes, but only if your authorization server exposes an API that generates authorization codes or access tokens by using a session identifier without having the user to log in again.
- Q: Can users do device discovery after linking their accounts?
-
Yes. The user experience after linking the accounts is the same as in the Alexa-app only flow.
- Q: Can users consent to skill permissions?
-
Yes. Users can continue to grant skill permissions before linking the accounts.
- Q: Can users link their personal accounts for skills that work with skill personalization?
-
Yes. The app-to-app account linking flow supports the linking of personal accounts.
- Q: How do I know the user's Alexa app supports the app-to-app account linking flow?
-
The Alexa app sends requests to your app when the user has a version of the Alexa app that can finish the app-to-app account linking flow.
- Q: How does a user revoke account linking?
-
Disabling the skill unlinks the user's account. As with any skill, a user can say, "Alexa, disable <skill name>" or the user can disable the skill from the skill's detail page.
- Q: I configured my skill to send Alexa Events. How do Alexa events work with the app-to-app flow?
-
If you enable the Send Alexa Events permission for the skill, your lambda function must handle the
AcceptGrantdirective. If your skill doesn't handle this directive, account linking fails when the user attempts to enable your skill. For details, see Request Access to the Alexa Event Gateway.
Related topics
Last updated: Feb 04, 2026